What is NetEA?
Net Epic Armageddon, or NetEA, is the name of the Tactical Wargame Network’s development of fan-made rule extensions, army lists and army list updates for Games Workshop’s Epic Armageddon. The main focus of NetEA is to clarify the rules of Epic Armageddon and balance its tournament army lists against one another for the fun and enjoyment of all.
What is the Tournament Pack?
The NetEA Tournament Pack consists of the following:
- The Epic Armageddon game rules and all of the errata that used to be found on Games Workshop’s Epic Armageddon Resources web page. All is stressed here as some errata was missing from the rulebook sections that used to be found on the web page above.
- The most up-to-date FAQ available, essentially an expanded version of the FAQ that used to be found on the web page above. Each Q&A is a footnote in the appropriate section of the rules.
- All of the NetEA Approved tournament army lists and any rule extensions and Q&A’s that accompany them. NetEA Approved army lists are tournament ready and balanced against one another using the Epic tournament game rules.
Will the Tournament Pack be updated?
Yes. The plan is to update the Tournament Pack every month, as needed.
Which version of the Tournament Pack is this?
Each Tournament Pack has its publication date on most of its pages, this is how it is versioned.
Where can I get the latest version of the Tournament Pack?
The NetEA Tournament Pack website (tp.net-armageddon.org).
What’s the best way to print the Tournament Pack?
Doubled-sided at 100% on either letter or A4-sized paper.
What’s a good forum for all things Epic?
Tactical Command (taccmd.tacticalwargames.net) is, hands down, the best Epic forum there is.
I found an error/typo, where should I report it?
The TacComm forums.
Where can I find more Epic army lists?
TacComm has tons of them, and many are included in the NetEA Army List Compendium found on the NetEA website (net-armageddon.org). They are clearly labelled as NetEA Approved, Developmental and Experimental so you have an idea on how well play-tested each list is. In addition, be sure to check out Epic-UK (epic-uk.co.uk) or epic_fr (epic-fr.niceboard.com) to see what the locals in your area are using.
Where can I buy Epic models?
At this point, the various forums that have been listed, eBay or Bartertown is your best bet for the out-of-print models. However, there are many 6mm science fiction manufacturers with products that make excellent proxies for Epic units. Most post on the TacComm forums.
Is this thing Games Workshop official
?
Yes and no. While the rules presented here are those found in the Epic Armageddon rulebook, the FAQs have been expanded upon based on what is available from Games Workshop.
Additionally, the army lists presented here will have some price and composition differences when compared to what used to be provided on Games Workshop’s website. These changes were all done in the name of balance and have the support of the TacComm community. For the most part they are fairly minimal and should not be viewed as game changing/breaking
.
Are the rules that used to be on Games Workshop’s Epic Armageddon Resources web page available anywhere?
Yes, they are on the NetEA website (net-armageddon.org).
This document is completely unofficial and in no way endorsed by Games Workshop Limited.
Adeptus Astartes, Battlefleet Gothic, Black Flame, Black Library, the Black Library logo, BL Publishing, Blood Angels, Bloodquest, Blood Bowl, the Blood Bowl logo, The Blood Bowl Spike Device, Cadian, Catachan, the Chaos device, Cityfight, the Chaos logo, Citadel, Citadel Device, City of the Damned, Codex, Daemonhunters, Dark Angels, Dark Eldar, Dark Future, the Double-Headed/Imperial Eagle device, ’Eavy Metal, Eldar, Eldar symbol devices, Epic, Eye of Terror, Fanatic, the Fanatic logo, the Fanatic II logo, Fire Warrior, Forge World, Games Workshop, Games Workshop logo, Genestealer, Golden Demon, Gorkamorka, Great Unclean One, the Hammer of Sigmar logo, Horned Rat logo, Inferno, Inquisitor, the Inquisitor logo, the Inquisitor device, Inquisitor:Conspiracies, Keeper of Secrets, Khemri, Khorne, Kroot, Lord of Change, Marauder, Mordheim, the Mordheim logo, Necromunda, Necromunda stencil logo, Necromunda Plate logo, Necron, Nurgle, Ork, Ork skull devices, Sisters of Battle, Skaven, the Skaven symbol devices, Slaanesh, Space Hulk, Space Marine, Space Marine chapters, Space Marine chapter logos, Talisman, Tau, the Tau caste designations, Tomb Kings, Trio of Warriors, Twin Tailed Comet Logo, Tyranid, Tyrannid, Tzeentch, Ultramarines, Warhammer, Warhammer Historical, Warhammer Online, Warhammer 40k Device, Warhammer World logo, Warmaster, White Dwarf, the White Dwarf logo, and all associated marks, names, races, race insignia, characters, vehicles, locations, units, illustrations and images from the Blood Bowl game, the Warhammer world, the Talisaman world, and the Warhammer 40,000 universe are either ®, TM and/or © Copyright Games Workshop Ltd 2000-2026, variably registered in the UK and other countries around the world. Used without permission. No challenge to their status intended. All Rights Reserved to their respective owners.
Epic Game Rules
It is the purest folly to believe that an individual can save Armageddon. Wars are not won by heroes, they are won by firepower and force, and the application of strategy and tactics.
On the following pages you will find the core rules for the Epic game system, covering all of the basic mechanics of the Epic game. The core rules describe how units (that’s to say any kind of infantry or armoured vehicles) move and fire on each other and participate in assaults.
Scattered through the rules you will occasionally find Special Rule boxes. Most special rules are described in rules sections 2.0–4.0, but some rules you really need to know about earlier on and because of this we’ve included them with the core rules. You will also find Design Concept boxes that explain certain fundamental principles of the rules. We’ve put these off to one side rather than include them in the rules proper in order to save repetition, and also to allow us to explain in rather more detail the concepts and philosophy behind the rules. The author feels quite strongly that disputes or misinterpretation of the rules can be minimised if you understand why a rule is written the way it is.
We highly recommend that you play several games using the core rules before fighting battles using the full range of Epic scale vehicle and infantry miniatures that use the special rules. In order to help with this we’ve included a number of training scenarios
at the end of the core rules that will allow you to try the rules out quickly and easily.
What You Will Need to Play
In order to play you will need to get hold of Epic scale miniatures. These miniatures are available from Games Workshop stores and Direct Sales as well as independent specialist hobby shops.
You will also need a small amount of gaming terrain. You can use the hills and trees made for Warhammer or Warhammer 40,000 and available from the same places as Epic miniatures if you don’t have any Epic scale terrain, or just lay a cloth over some books to create rolling, hilly terrain. Forge World sells a wide array of detailed resin terrain pieces to expand the boundaries of your battle settings.
In addition to models, a suitable battlefield, and players you’ll need a few more essential items to begin play:
- Templates
- Certain weapons in Epic, such as the huge Imperial Earthshaker Cannon, have an area effect rather than targeting a specific unit. These attacks are represented by placing a circular template over the target and attempting to affect any units under it. Two types of template are used in Epic, a Barrage template that has a diameter of 7.4cm, and a larger Orbital Bombardment template that has a diameter of 12cm. The type and intensity of the attack will dictate which template is used and how many templates may be required. Copies of both templates can be found at the end of the core rules, or you can use the plastic Blast and Ordnance templates produced by Games Workshop. You can also make your own versions of the templates from card or acetate.
- Measuring Instrument
- You will need some kind of measuring instrument marked in centimetres (cms) in order to play Epic. You will find a retractable measuring tape most useful for measuring movement and shooting distances. If you only have a measuring instrument marked in inches then you can use it by halving any distances measured in centimetres and using the result as a distance in inches instead. For example, if the rules said 5cm you would count this as 2.5″ instead. Please note that if you decide to measure any distances in inches then both players must do so!
- Paper and Pens or Pencils
- You may need to record details of casualties and damage to those gigantic war engines occasionally during a game, so it’s useful to have some paper and a writing implement handy.
- Dice
- In Epic you’ll need buckets full of ordinary six-sided dice to resolve shooting and fighting in an assault. These are referred to as a D6. If you need to roll more than one dice, then this is written as 2D6 (for roll two dice) or 4D6 (for roll four dice) and so on. If you have to add something to the total of the roll, this is added afterwards. For example, D6+6 means roll one dice and add 6 to the score to get a total between 7 and 12. If asked to roll a D3 simply roll a D6 and count a roll of 1–2 as a 1, a roll of 3–4 as a 2, and a roll of 5–6 as a 3. In some cases a unit or formation will need to roll a 1 or higher on a D6. In this case the roll automatically succeeds and no dice roll is strictly necessary (though you can roll anyway if you wish!).
- Blast Markers
- An army in battle tends to get worse at fighting as it is subjected to enemy fire and loses close combats. In Epic, Blast markers represent this. You can either make your own Blast markers, or use the Battle Markers produced by Games Workshop, or keep track of things with paper and pencil or some other method if you prefer. As long as you know how many Blast markers a formation has accumulated during the game then whatever method you use is fine with us!
Units
Epic lets you fight battles with everything from lowly infantry to the terrifying war engines that dominate the battle zones of the 41st Millennium. From the smallest to the greatest, every warrior and weapon has its part to play. Different types of unit complement one another in combat—war engines fighting in cities need infantry to enter buildings and drive out enemy troops, infantry in the open need support from their own tanks and war engines lest they be swept away by enemy war engines.
No matter what their size, the Citadel miniatures used to play Epic are referred to as units in the rules that follow. Each unit is an individual playing piece with its own capabilities. A unit may consist of a single model tank, a gigantic war engine, or several infantry models mounted together on a single base, but in the rules all of these things are simply referred to as units.
Important: The core rules on the following pages only cover infantry and armoured vehicles. The rules for specialist units in Section 2.0 introduce several new unit types and characteristics, rules for Titans and other war engines are introduced in Section 3.0, and rules for aircraft in Section 4.0.
Unit Types
All units in the core rules are subdivided into two broad categories: Infantry and Armoured Vehicles.
- Infantry (INF)
- This designation includes all personnel not mounted inside a vehicle. Infantry are represented by between three and seven Epic infantry models mounted on a single base (see Stands for details). Field artillery such as Ork Big Gunz also fall into this category, as do infantry that ride on bikes or horses.
- Armoured Vehicles (AV)
- As their name implies, these vehicles are covered with thick armour plate. The category includes tanks such as Leman Russ and Land Raiders, as well as armoured troop carriers like the Rhino. Armoured vehicles are represented by a single model.
Stands
As previously noted, a unit can be a single vehicle model, or a stand made up of several very small models grouped together and glued to a small base. Stands usually represent things like infantry, where moving the individual models round on their own would be very fiddly with Epic scale models. All the models glued to a stand count as a single unit as far as the rules are concerned. The size of a stand and the number of models glued to it are left pretty much up to the player to decide within the following limitations:
- A stand may be no more than 40mm and no less than 5mm across in any direction.
- A stand must be at least 20mm across in one direction (i.e., a 5mm by 5mm stand is not allowed, but a 5mm by 20mm stand would be okay).
- Stands representing infantry units must have at least three infantry models and may not have more than seven. Infantry mounted on bikes or horses must have between two and four models mounted on each base.
- Stands representing artillery must have between one and two artillery pieces and up to six crew models.
Unit Datasheets
Each unit in Epic has a datasheet that tells you how fast, shooty and tough the unit is. Each datasheet provides the following information:
- Type
- What target type the unit belongs to.
- Speed
- The speed of the unit. This is the distance in centimetres the unit can move each turn while still firing its weapons fairly effectively. It is possible for units to move faster than this if you wish, but their shooting will be far less effective.
- Armour
- This number shows how well protected and/or difficult to damage the unit is. If a hit is scored on the unit then you must roll this number or higher on a D6 to
save
the unit from the damage. - Close Combat
- This number shows how effective the unit is at close combat. It is used when the unit charges an enemy unit, or is charged itself.
- Firefight
- This shows how effective the unit is when involved in a short-ranged firefight.
- Weapons
- This section of the data sheet lists what weapons the unit carries. If a unit carries more than one of a type of weapon then this will be noted as a
multiplier
by the weapon’s name. For example, a Space Marine Tactical squad is noted as having aMissile Launcher
, while a Space Marine Devastator squad is noted as having2× Missile Launcher
. - Range
- The range of the weapon in centimetres.
- Firepower
- The numbers here represent how effective the weapon is when it shoots. Firepower comes in two
flavours
: Anti-personnel (abbreviated to AP) and Anti-tank (abbreviated to AT). AP fire is used against infantry targets and AT fire against armoured vehicles. A weapon that has both an AP and an AT value may choose to use either one when it attacks, but may not use both in the same turn. - The value listed for a weapon is the score required on a single D6 to score a hit. Most weapons only roll one D6 to hit when they shoot. However, if a weapon’s firepower value is preceded by a multiplier then a number of dice equal to the multiplier should be rolled instead. For example, a weapon with a firepower of
AP5+
would roll one D6 to hit, while a unit with a firepower of3× AP5+
would roll three D6. Sometimes the entry will specify a dice roll rather than a fixed number. For example, a weapon that hadD3× AP5+
would attack D3 times each time it was used. - Special Rules
- Some weapons have additional abilities (see Specialist Units and Weapons) and may have limited fire arcs (see Weapon Fire Arcs).
- Notes
- If any special rules apply to the unit then they will be noted here. An explanation of what effect these rules have can be found in sections 2.0–4.0.
Datasheets for units from the Epic Game can be found in Section 5.0.
Formations
On the battlefield, vehicles and troops don’t just mill around individually, instead they are organised so that they fight as a unified whole. In Epic, a body of troops and war machines that fights together on the battlefield is referred to as a formation.
Formations
All units must be organised into formations at the start of the game. The scenarios included in these rules will tell you what formations each side may use. If you are devising your own scenario then you must decide what formations the units taking part will fight in before the battle begins.
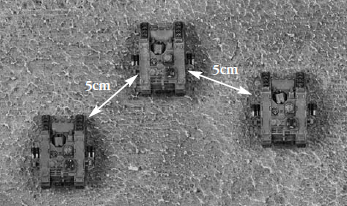
Every unit in a formation must be no further than 5cm from at least one other unit in the same formation. In addition, all units must form a chain
without any gaps of more than 5cm. Sometimes the units in a formation will become separated due to enemy fire or assault. When this happens, the formation must close back up again into a legal formation when it next takes an action (see Actions).
Initiative Values
Each formation has an initiative value that represents how well trained and motivated it is. The lower a formation’s initiative value is, the better (e.g., an initiative of 1 is better than an initiative of 2). Formations with good initiative values are more likely to carry out orders, and will rally more quickly than formations with worse initiative values. You will find that a formation’s initiative value is one of its most important characteristics. Some example initiative values are shown below:
| Formation | Initiative Value |
|---|---|
| Space Marine | 1+ |
| Imperial Guard | 2+ |
| Ork | 3+ |
Blast Markers
During a game of Epic the formations under your command will receive Blast markers when they come under fire, take casualties, fight in assaults, or fail initiative tests. Blast markers can be removed when a formation rallies or regroups (see Regrouping and Broken Formations and Rallying Formations). The effects of blast markers will make more sense when you have read the rest of the rules, but in summary:
- A formation receives one Blast marker every time it is shot at by an enemy formation, even if no casualties are caused, unless the rules specifically state otherwise.
- In addition, a formation receives one Blast marker every time a unit is destroyed, unless the rules specifically state otherwise.
- Each Blast marker suppresses one unit in the formation and stops it from shooting. Blast markers also affect a formation’s ability to carry out actions, win assaults, and rally. A formation is broken when the number of Blast markers equals the number of units in the formation, unless the rules specifically state otherwise. A broken formation has to withdraw, and is not allowed to take actions in the action phase (which basically means it can’t move or shoot). It must try to rally in the end phase.
| Blast Markers | Result | Effect |
|---|---|---|
| Each Blast Marker | Unit Suppressed | May not shoot |
| One per unit | Formation Broken | Withdraw |
Sequence of Play
An Epic battle is fought over a number of turns. How many turns a battle will last is determined by the players themselves or the scenario being fought.
Epic uses the following sequence of play. As you can see, each turn in Epic Armageddon is split into three phases. However, the bulk of the action occurs, appropriately enough, in the action phase. During this phase, the players take it in turn to pick one of the formations in their armies and carry out an action with it. Each formation in an army can carry out one action. After both players have taken one action with each of their formations, they move onto the end phase. This is basically a tidy-up
phase, where things that are not carried out during the action phase are sorted out. Note that both players do things in each phase, so both carry out actions in the action phase, rally broken formations in the end phase, and so on.
Sequence of Play
- Strategy Phase
- Each player rolls a D6 and adds their army’s strategy rating to the score. Whoever scores higher may choose to go first or second in the action phase.
- Action Phase
- The players alternate carrying out actions with their units.
- End Phase
- Both players rally formations with Blast markers or that are broken, and then check the scenario victory conditions to see if either side has won.
Abilities Used at Start of Turn/Action
Some units have special abilities that are specified as taking effect at the beginning of the turn. These effects are resolved before the Strategy roll. Similarly, abilities that are used at the start of an action can be taken before the Initiative roll is made or the action chosen. If both players have effects for the beginning of the turn, take turns resolving them starting with the player with the higher Strategy rating, alternating between players for each subsequent effect until all effects are resolved.
The Strategy Phase
Each army has a strategy rating. This will either be listed in the notes for a scenario, or can be found in the army list if you are playing a tournament game. An army’s strategy rating represents a mixture of its aggression and the ability of its commanders. An army with a high strategy rating is more likely to act before an enemy with a lower strategy rating.
In the strategy phase at the start of each turn both players make a strategy roll by rolling a D6 and adding their strategy rating to the score. The player whose army scores higher can choose to go first or second in the action phase. In the case of a tie, the side that failed to win the initiative last turn gets it on this turn.
The Action Phase
In the action phase, the players take it in turns to carry out actions with their unbroken formations. Each unbroken formation can take one action per turn. The player that won the strategy roll can choose whether to go first or second.
The player going first then carries out an action with one formation, and then their opponent does likewise, and so on until all formations have taken an action. If one player runs out of formations to activate, then the opposing player may keep on activating formations one after the other until all of his formations have taken an action.
There are three steps to carrying out an action:
- Nominate a formation.
- Declare which action it will carry out.
- The formation must then pass an action test to see if it carries out the action successfully.
Each of these steps is explained in more detail below. Note that you must declare both the formation and the action it will carry out before taking the Action test. If you fail to do these things, then the formation chosen automatically fails the Action test without the dice being rolled (we can imagine this is due to a communications failure). If you failed to even nominate the formation then your opponent may nominate the formation for you.
Actions
To carry out an action, first nominate an unbroken formation and then choose an action for it to carry out. The actions that can be chosen are listed as follows. Note that you must activate a formation if you can, you can’t choose to pass
unless you have no choice in the matter. Also note that a formation may only be activated once per Action phase.
- Advance
- The formation may make one move and then shoot.
- Engage
- The formation may make one
charge
move and then fight an assault. - Double
- The formation may make two moves and then shoot with a -1 modifier.
- March
- The formation may make three moves.
- Marshal
- The formation may either shoot with a -1 modifier and then regroup, or make one move and then regroup. Regrouping allows the formation to remove some of the Blast markers affecting the formation (see Regrouping and Broken Formations).
- Overwatch
- The formation may not move, but instead enters overwatch. Being on overwatch allows the formation to interrupt an enemy formation’s action to shoot at it. You may not choose this action if the formation has any units that are out of formation.
- Sustained Fire
- The formation may not move (not even to turn in place), but can shoot with a +1 modifier. You may not choose this action if the formation has any units that are out of formation.
In addition to these basic actions, there are two more special types of action a formation may make:
- Hold
- This action is the only one allowed to a formation that fails an Action test (see the rules for action tests next). The formation may make one move or shoot or regroup. You must choose to move if any units are out of formation.
- Special Actions
- Some formations are allowed to carry out special actions. Some of these are described in the Special Rules section of this rulebook, or they may be included in the rules for a scenario.
The Action Test
Before a formation can carry out an action it must pass an action test. Broken formations may not take an action. Instead they must pass a rally test in the end phase in order to rally. See the rules for broken formations (Regrouping and Broken Formations) later on.
To pass an action test, you must roll equal to or over the formation’s initiative value on a D6. If the formation passes the action test, it may carry out the stated action. If the formation fails the test, it can still carry out a hold action (even if the player nominated something else), but the formation receives a Blast marker. There is a -1 modifier to the action test if the formation has one or more Blast markers, and a further -1 modifier if the formation is trying to retain the initiative (see Retaining the Initiative).
| Formation has at least one Blast marker | -1 | |
| Formation is trying to retain the initiative | -1 | |
| Action Test Result | Actions | Notes |
|---|---|---|
| Pass Action Test | Any | Player may attempt to retain the initiative (see Retaining the Initiative). |
| Fail Action Test | Hold | Formation receives one Blast marker. Player may not attempt to retain the initiative. |
Retaining the Initiative
Once you have successfully carried out an action with a formation, you may if you wish try to retain the initiative and take two actions in a row. If you decide to retain the initiative then you must nominate a new formation and declare the action it will carry out, but the formation will suffer a -1 modifier to its action test. Note: If the first formation fails its action, you may not attempt to retain the initiative—i.e., you may only attempt to retain the initiative after a successful action.
You must hand over the initiative after you have completed the action for a formation that retained the initiative (i.e., you can’t retain the initiative twice in a row). The only exception to this is if one player has no formations left to activate. In this case, the other player may keep on activating formations without suffering the -1 modifier for retaining the initiative until all of the opposing formations have taken an action.
Movement
Most actions allow all the units in a formation to make one or more moves. Units move a distance in centimetres up to the Speed value shown on their datasheet—there is no compulsion on players to use the total move available to them. Depending on the action they are taking, a unit may move one, two or three times (see Multiple Moves). They may turn freely as they move. A unit is never forced to move, but sometimes failing to do so can result in its destruction (see Withdrawals). Once a player has moved a unit and removed his hand from the model, the move may not be changed.
Multiple Moves
If an action allows units to make multiple moves, take each move one after the other, following the rules that follow for each move (i.e., don’t simply add the movement distances together). For example, a Space Marine Tactical detachment (Speed 15cms) taking a March action would make three moves of 15cm each, rather than one move of 45cms.
Other Units
Enemy units may never move over or through each other. With the exception of infantry, a friendly unit may never move directly over another friendly unit. You can move over infantry units with other units, as the stationary infantry are assumed to get out of the way. Note that moving over
refers to the model itself, not the unit’s base.
Zones of Control
All units in Epic have a zone of control that extends 5cm in every direction from the model. Models mounted on a stand may measure the zone of control from any model on the stand.
Units may not enter an enemy zone of control while they move, unless they are undertaking an engage action and use their charge move to get into base contact with the nearest enemy unit whose zone of control they have entered. Once a unit has been contacted by an engaging enemy unit, it loses its own zone of control for the rest of that engage action (including the ensuing assault). This will allow other units to move round it. Units are never allowed to cross directly over an enemy unit, even if it has lost its zone of control.
If a unit finds itself in an enemy zone of control for any reason, then it must either charge the enemy or leave the zone of control when it next takes an action (note that this will require an action that allows it to charge or move).
Formations
Any units that are out of formation for any reason after a formation has taken the movement part of its action are destroyed. The controlling player may choose which units are out of formation
and destroyed. Note that each unit lost will place one Blast marker on the main part of the formation. This applies after each individual move, so if a formation made a march action, you can’t wait until the end of all three moves in order to bring units back into formation—any out of formation units are destroyed at the end of the first move (and again at the end of the second and third moves if any other units have also ended up out of formation following the move).
Transport Vehicles
Many formations include transport vehicles that can be used to carry other units that belong to the same formation. The number and type of units that can be carried will be listed on the transport vehicle’s datasheet. Transport vehicles may only carry units from their own formation. Transport vehicles can pick up and carry units as part of the transport vehicle’s move. The vehicle simply moves into base contact with the unit to be picked up, and then carries on with its move as normal. Note that the transported unit is not allowed to move themselves during the move when they are picked up.
Transported units may disembark at the end of any move after the move in which is it was picked up. This happens after any overwatch shots (see Overwatch) but before the moving formation shoots or assaults. Disembarking units may be placed within 5cms of the transport vehicle. If the formation has engage orders then they may be placed in base contact with an enemy unit. Otherwise they may not be placed within an enemy unit’s zone of control. Note that units do not have to disembark, and may remain in their transport if they prefer. Units may not be picked up and disembark as part of the same move, though a formation making multiple moves as part of a march or double action could pick up units in one move and drop them off as part of a subsequent move. Units may embark or disembark as part of a counter-charge move (see Counter Charges), unless the transport vehicle carrying them is already in base contact with two enemy units—in which case they must stay on board (they are trapped inside!).
Units being transported may not shoot unless the transport vehicle’s datasheet specifically says otherwise. Transported units are counted towards the number of units in the formation for all rules purposes (i.e., when working out the number of units involved in an assault or if the formation is broken by Blast markers, etc.). If the transport unit is destroyed, then any transported units may make their normal armour save or make a 6+ cover save. See Macro Weapons if a transport is destroyed by a macro-weapon.
Please note that a transport vehicle that is being transported cannot transport other units itself (i.e., the Russian Doll
tactic is not allowed!).
Terrain
The galaxy is a vast place with millions of different worlds. The terrain covering these worlds can vary from empty plains to sky-scraping hive cities, and from verdant jungles to arid ash-waste deserts. Only one factor is common to them all, and that is that they all have areas where it is difficult to wage war!
In Epic, terrain affects units in one of three ways:
- The terrain has no effect on the unit when it moves through it.
- The terrain is impassable to the unit so it cannot move through the terrain under any circumstances.
- The terrain is dangerous to the unit, so the unit can enter the terrain but it might take damage (see Dangerous Terrain Test).
The Terrain Effects table on the next page details some common types of terrain and the effects they have on different types of unit. How to represent terrain on the battlefield is discussed later on in this rulebook.
Dangerous Terrain Test
Roll a D6 when you enter dangerous terrain, or when you start to move if already in dangerous terrain. On a roll of 1, the unit is destroyed with no save allowed, but the formation it is part of does not receive a Blast marker.
Units may choose to move through dangerous terrain cautiously. A unit that is moving cautiously counts as having a speed of 5cm, but is allowed to re-roll any Dangerous Terrain tests that it fails.
Cover to Hit Modifiers
Units that are in terrain that is tall enough to at least partially obscure them from an attacker’s view receive a -1 to hit modifier when being shot at (see Roll to Hit). The to hit modifier also applies if intervening terrain obscures the target partially from view.
Infantry Cover Saves
Certain terrain is noted as giving infantry a cover save. While in such terrain, the infantry receive the cover save listed on the Terrain table in addition to the -1 to hit modifier for being in cover. The cover save can be used instead of their normal armour save whenever they have to take an armour save. Note that they can use one or the other of these saves against a hit, not both.
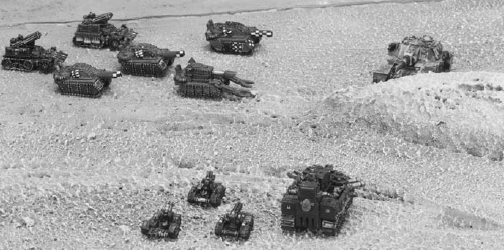
hull downposition behind a low ridge. From this position it counts as being in cover against attacks from the Ork formation with the Battlefortress and Buggies attacking it from the front, and so they will suffer the -1 to hit modifier. However, the Ork Gunwagons have manoeuvred to a position where the ridge does not block their line of fire, and so they do not suffer the penalty.
Terrain Effects
- Fortifications
- Units in fortifications receive the -1 to hit modifier for being in cover and may ignore the -1 save modifier for being caught in a crossfire, though they still receive the extra blast marker (see Crossfire). In addition, infantry in fortifications receive a 3+ cover save. Fortifications are normally impassable terrain for vehicles unless they are specifically designed to hold them (e.g., tank emplacements).
- Hills
- Units on hills will benefit from better lines of sight to enemy units, as they will be high enough to see over some terrain features (see Who May Shoot, Line of Fire). This aside, units on hills count as being in open ground (or whatever other type of terrain they occupy that is also on the hill, such as roads, woods or buildings).
- Open Ground
- Infantry count as being in cover (-1 to hit modifier) and receive a 5+ cover save if they are on Overwatch in Open Ground. This represents the fact that stationary infantry are very hard to see. Note that the save will be lost after the infantry shoot and the Overwatch marker is removed.
- Roads
- Units that spend a whole move on a road may add 5cms to their move. In addition, if all of the units in a formation are on a road at the start of their action, you may declare they will make a road march. The formation takes a march action, and automatically passes the Action test. However, all of the units in the formation must remain on the road for the entire three moves.
- Armoured Vehicles
- Infantry count as being in cover and receive the -1 to hit modifier (but no cover save) if they are touching an armoured vehicle or war engine, to represent their ability to take cover from enemy fire by crouching behind the vehicle.
| Terrain | Infantry | Vehicle | War Engine |
|---|---|---|---|
| Buildings | 4+ Cover Save | Impassable | Impassable |
| Cliffs | Impassable | Impassable | Impassable |
| Fortifications | 3+ Cover Save, See rules | See rules | Impassable |
| Jungle | 4+ Cover Save | Impassable | Dangerous |
| Marsh | 6+ Cover Save, Dangerous | Dangerous | Dangerous |
| Open Ground, Hill Slopes | No Effect | No Effect | No Effect |
| River | 6+ Cover Save, Dangerous | Impassable | No Effect |
| Roads | See rules | See rules | See rules |
| Ruins, Rubble | 4+ Cover Save | Dangerous | Dangerous |
| Scrub | 6+ Cover Save | No Effect | No Effect |
| Woods | 5+ Cover Save | Dangerous | Dangerous |
Shooting
Many actions allow a formation to shoot. This takes place in the Action phase when the formation takes its action.
Picking a Target
When a player picks one formation to fire, an enemy formation is also chosen as its target. Formations may not split fire—any units unable to shoot at the nominated target formation lose the chance to shoot altogether.
Weapon Fire Arcs
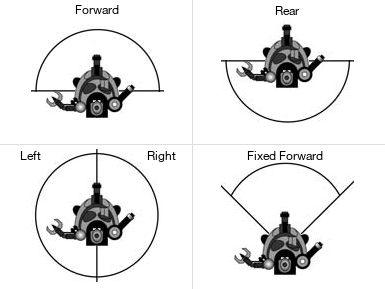
Most weapons can be fired in any direction (i.e., the unit does not have to be pointing at the target). However, in some cases, a weapon will be noted as having a limited weapon arc.
Weapons that are noted on the data sheet as firing to the forward have a 180° arc of fire to the unit’s front, while weapons noted as firing to the rear have a 180° arc of fire to the unit’s rear. Weapons with a left fire arc may fire in the 180° arc to the unit’s left side, while weapons with a right fire arc can fire 180° to the unit’s right. Finally, weapons that are noted as fixed forward firing can only fire on targets that lie within 45° of either side of the direction that the unit is facing.
Who May Shoot
In order to shoot, a unit must be in range and have a line of fire to at least one unit in the target formation, and must not be suppressed.
- Line Of Fire
- The line of fire is a straight line drawn from the shooting unit to one unit in the target formation. The line of fire is blocked by terrain features such as buildings, hills, woods, etc. Weapons higher up can often see over any terrain that is lower down. Buildings, rubble, woods, fortifications and the like don’t block the line of fire to or from units that are in the terrain itself unless the line of fire passes through more than 10cms of the terrain feature (i.e., you can shoot 10cms
into
a terrain feature, but the line of fire is still blocked to units on the other side). The only units that can block the line of fire are war engines (see War Engines). Other units do not block the line of fire for friend or foe. - Range
- In order to shoot, a unit must be in range of a unit to which it has a line of fire in the target formation.
- Suppressed Units
- One unit that has a line of fire and is within range may not shoot for each Blast marker on the formation. Units are suppressed
from the back to the front
of a formation, with the front and the back being determined by the location of the target formation. The units that are the furthest away from any units in the target formation are suppressed first, on the basis that troops lurking at the rear are more likely to keep their heads down than the more gung ho chaps at the front! If several units are equally far away from the target formation, then the controlling player may choose which to suppress.
Shooting Procedure
This is a summary of the shooting procedure. We’ll work through it step-by-step in the rules that follow.
- Place one Blast marker on the target formation.
- Roll to hit.
- Allocate hits, make saving throws and remove casualties.
- Place additional Blast markers for casualties and check to see if the enemy formation is broken.
Place Blast Marker
The target formation automatically receives a Blast marker as long as at least one attacking unit can shoot at the formation. An additional Blast marker is received for each unit that is destroyed. A formation receives a Blast marker for coming under fire even if none of the attackers can cause any damage (e.g., armoured vehicles coming under heavy bolter fire).
Roll to Hit
The player must decide at this stage whether weapons will fire with their AP or AT values if they have both. Then roll a D6 for each shot being directed at the target formation. You must roll equal to or higher than the appropriate to hit
value to score a hit (e.g., if the weapon has an AT4+, you must roll a 4 or more to hit). The dice roll is modified for the following reasons. However a roll of 1 before modification is always counted as a miss.
| Target is in cover | -1* |
| Attacker is carrying out a double or marshal action | -1 |
| Attacker is carrying out a sustained fire action | +1 |
| *The attacker can choose to ignore the cover modifier if it applies to some units in the target formation but not to others. However, you can’t score hits on units in cover unless you take the -1 to hit modifier. | |
Needing 7+ to Hit
If to hit modifiers result in a required score of 7 or more to hit then it is still possible to score a hit, though very unlikely. As it is impossible to roll a 7 on a D6 (go on, try if you don’t believe us), you will first need to roll a 6, and then, for each dice rolling a 6, you will need to roll a further score as shown on the chart below. So, for example, to roll an 8 you must roll a 6 followed by a 5 or 6.
| Target | D6 rolls needed |
|---|---|
| 7 | 6 followed by 4, 5 or 6 |
| 8 | 6 followed by 5 or 6 |
| 9 | 6 followed by 6 |
| 10 | May not be hit |
Allocate Hits & Make Saving Throws
You must allocate hits inflicted on your formation against targets that are within range and line of fire of the enemy. Hits are allocated from the front to the back
of a formation. Note that this is the opposite of suppression. AP hits can only be allocated against infantry units, and AT hits may only be allocated against armoured vehicles. Hits must be allocated to the closest potential target first. You may not allocate a second hit to a unit until one hit has been allocated to every potential target, or allocate a third hit until all targets have been allocated two hits, etc.
Once all hits have been allocated, make saving throws for each unit that has been hit, using the unit’s armour value from its datasheet or the cover save from the terrain table. Roll a D6. If the score is lower than the armour value or cover save value then the unit fails its save, and is destroyed and removed from play. If the roll is equal to or greater than the armour or cover save value then the unit is saved and it remains in play. Make a separate save for each hit the unit suffers. Remember that the target formation receives a Blast marker for each unit that is destroyed.
If an attacking formation scores hits both with normal weapons and weapons with the macro-weapon ability, then the opposing player must allocate and make any saves for the normal hits first, and then allocate and make any saves for the macro-weapon hits. Hits from macro-weapons can only be applied to units that are in a position to be hit by a macro-weapon (Note: With the exception of War Engines (see Close Combat and Firefight Attacks), during an assault, all units up to 15cm away are valid targets for allocation, regardless of whether the hits are from CC or FF).
Check to See if Target Breaks
Once the attack is completely resolved, you must check to see if the target formation has been broken by the Blast markers it has received. The formation breaks if the number of Blast markers equals or exceeds the number of units in the formation. Note that formations do not break part way through a shooting attack—only once it has been resolved.
Barrages
Many artillery pieces, rocket launchers and some other weapons fire a barrage of shots causing mass destruction on the enemy. When these guns or launchers are grouped together in an attack they always fire a single barrage at the same target. On their datasheets, these weapons have no to hit rolls—instead they have a number of barrage points (BPs). The main difference between a barrage and a normal attack is that the barrage covers a substantial area and so may hit several units.
To fire a barrage, first take a Barrage template (see What You Will Need to Play) and place it on the table where you want the barrage to land. Each weapon contributing to the barrage must be within range and have a line of fire to at least one unit under the template. Weapons that are not in range or do not have a line of fire to an enemy unit that falls under the template may not fire at all this turn. You are allowed to place templates over your own units, or units from several enemy formations if you wish but all units under the templates—friend and foe alike—are attacked. Any formation that is attacked receives a Blast marker for coming under fire
(see Place Blast Marker). Next, refer to the data sheet to work out the total number of Barrage points. The whole formation fires at once, so the number of Barrage points for each weapon that is in range and has a line of fire is added together. When you have worked out the total number of barrage points refer to the barrage table below. Note that a formation may only fire one barrage per turn—a single formation may not fire separate barrages at different targets.
The Barrage table lists the hit roll required to hit each unit under the Barrage template. Roll to hit all units (friend or foe) under the template with the appropriate to hit values. In order to speed dice rolling we recommend rolling to hit all units of exactly the same type together, and then removing any casualties from those closest to the enemy first.
| Barrage Points | Extra Templates | Extra Blast Markers | To Hit Rolls | |
|---|---|---|---|---|
| AP | AT | |||
| 1 | None | None | 6+ | 6+ |
| 2 | None | None | 5+ | 6+ |
| 3 | None | None | 4+ | 5+ |
| 4–5 | One | None | 4+ | 5+ |
| 6–7 | One | One | 4+ | 5+ |
| 8–9 | Two | One | 4+ | 5+ |
| 10–12 | Two | Two | 4+ | 5+ |
| 13–15 | Two | Three | 4+ | 5+ |
| 16–18 | Two | Four | 4+ | 5+ |
- Extra Barrage Templates
- Large barrages may receive extra Barrage templates. The Barrage table will tell you if a barrage receives any extra Barrage templates. Place any extra templates so that they touch the first template that was placed, and so that no templates overlap. All units under the templates are attacked with the barrage’s to hit values. Note that once the first template has been placed, the attacker may choose where to place the additional templates, as long as they are touching the first template, and no line of fire, placement or range restrictions apply (see below).
- Extra Blast Markers
- Really large artillery barrages are very effective at suppressing enemy troops as well as killing them. To represent this, a large barrage may inflict one, two or three extra Blast markers, as shown on the barrage table. The Blast markers are placed in addition to any Blast markers placed on a formation for it coming under fire or for any casualties that it suffered. If several formations are being attacked then each receives the appropriate number of extra Blast markers.
- Using Barrage Templates
- Deciding which enemy units have been caught underneath a circular Barrage template is another one of the things that can cause endless arguments during a game. The method we use (and the default you should use unless you have a different convention that you prefer) is that a unit is affected if any part of the model falls under the template, or at least one model on a stand. In addition, templates must be placed in such a way as to get as many enemy units from the target formation under them as possible within the restrictions for lines of fire and range. This stops players
sniping
at important units with artillery.
Overwatch
A formation that takes an overwatch action may not move, but may shoot, outside of the normal turn sequence, in response to an enemy formation’s movement. We mark formations on overwatch using the Games Workshop Order dice, but you can use other methods if you prefer. Note that if a formation has units more than 5cm from another unit in the formation (i.e., it is not in a legal formation), then the formation may not take an overwatch action, as it must move back into a legal formation if it can.
A formation that is on overwatch may choose to shoot immediately after an enemy formation completes a move or unloads troops, and before the target either shoots or assaults.
Note that a formation on overwatch is allowed to shoot at an enemy formation after any move, so it may shoot at a formation making several moves after it has completed one of these moves and before it carries out the next one. This stops fast formations using double or march actions to whiz past
a formation that is on overwatch.
Also note that formations on overwatch may only react when a formation moves or unloads troops. They may not to choose to shoot at a formation that does anything else in their line of fire, such as shooting without moving or regrouping.
Resolve the shooting attacks using the normal rules. The overwatching formation must shoot at the formation that triggered the shooting—it can’t pick a different target. Once it has fired, the formation is no longer considered to be on overwatch.
Formations remain on overwatch until they either shoot, or they undertake a new action in the following turn. Note that this means that a unit can go into overwatch on one turn, and not shoot until the following turn. Shooting in the following turn counts as your action for that turn, and will stop the formation taking an action later on. If the formation does not shoot in the following turn then it may take an action instead of shooting.
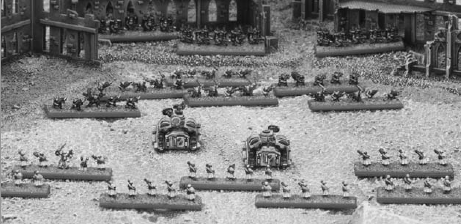
Crossfire
’Ere we go, ’ere we go, ’ere we go… Bloody hell, where’d dose beaky wagonz come from? Quick ladz, face dis way. No, no, no! Not dat way, dis way. Oi! Where are yooz boyz running off too? Come back ’ere ya yoosless lot… Bugga! Oh well, I guess I’ll just have to take out dem wagonz meself. ’Ere we go den… WAAAAAARGH!!!
Formations that take fire from the flank or rear are caught in a deadly crossfire, and will suffer additional casualties as troops struggle to find cover from attacks coming from an unexpected direction.
To represent this, formations are allowed to use the following rules to claim a crossfire bonus when they shoot. You can claim the crossfire bonus if you can draw a straight line up to 45cm long from any of the units in the shooting formation to any unit in another friendly formation and this line crosses a unit from the target formation or the gap between two units from the target formation.
The friendly unit that the crossfire line is drawn to must have a line of fire to a unit from the target formation, but does not have to be in range with any of its weapons. You may not use units that are in broken or marching formations to claim the crossfire bonus.
All units from a formation caught in a crossfire suffer a -1 save modifier. This may result in some units automatically failing their saving throw. Some terrain features or special rules may counter this modifier (see Terrain Effects and Thick Rear Armour).
In addition, a formation caught in a crossfire attack receives two Blast markers for the first unit destroyed by the attack, rather than just one Blast marker for the destroyed unit as would usually be the case (see Place Blast Marker).
Note that a formation attacked by several enemy formations, each of which can claim a crossfire, will receive the extra Blast marker from each enemy formation that inflicts one or more casualties.
Assaults
Formations that carry out an engage action are allowed to move and then fight an assault. An assault represents a situation where all hell breaks loose as troops desperately try to seize a vital objective, or fight a tenacious defence to keep the objective in friendly hands. Assaults are not necessarily face to face or toe to toe, simply close enough that individual infantry are able to engage in the fight and make use of their small arms, grenades and other short ranged weapons. Casualties will often be high on both sides, and at the end of the assault, one side or the other will be forced to withdraw with its morale shattered, leaving the field to the victor.
Assault Procedure
This is a summary of the assault procedure. We’ll work through it step by step in the rules that follow:
- Choose target formation
- Make charge move
- Make counter-charges
- Resolve attacks
- Work out result
- Loser withdraws
- Winner consolidates
Choose Target Formation
A formation taking an engage action must pick an enemy formation as the target of the assault. Any enemy formation may be chosen anywhere on the table, though for reasons that will become apparent it makes sense to choose someone fairly close by.
Under certain circumstances, a formation may assault two or more enemy formations (see the special rule for intermingled formations).
Make Charge Move
A formation undertaking an engage action is allowed to make one move (not a double distance move as is the case in many sets of wargame rules, not least many Games Workshop games), and then fights an assault against the enemy formation that was chosen as the target of the charge. This move is known as the charge move.
Make the move normally, as described in the movement rules given previously. Once the move is complete, the engaging formation must have at least one unit within 15cms of a unit from the target formation. If this is not the case then the assault does not take place and the action ends. This caveat aside, units from the charging formation may move in any direction and do not have to head towards the enemy.
Units making a charge move are allowed to enter enemy zones of control in order to move into base contact with an enemy unit from the target formation. Moving into base contact allows the unit to fight with its close combat value rather than its firefight value, as described below. This is the only time a unit may enter an enemy zone of control. See the rules for zones of control (Zones of Control). Note that charging units may not enter the zone of control of enemy units from another formation that is not the target of the assault.
A maximum of two units may move into base contact with each defender. A charging unit that enters a zone of control must move into base contact with the nearest enemy whose zone of control has been entered. Once a unit has been contacted it loses its zone of control for the rest of the assault, allowing other units to move past it.
It’s important to note that all you have to do is get one unit within 15cms of the enemy chosen as the target of the assault. There is no need for any units to get into base-to-base contact with the enemy unless you want them to.
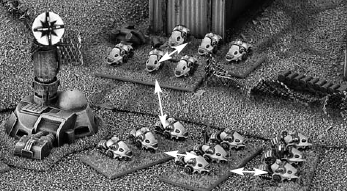
Counter Charges
An assault represents a brutal short-range battle involving movement, shooting and close combat. Although the assaulting formation will have initiated the combat, the defending formation will have time to react to the enemy assault and make limited moves of their own. To represent this, units from the defending formation involved in the assault are allowed to make a special move called a counter charge.
Defending units that are not already in base contact with an enemy unit are allowed to counter charge. Units with a speed of 30cm or more may make a counter charge move of 10cm. Units with a speed of 25cm or less may make a counter charge move of 5cm. Counter charges happen after the engaging formation has finished moving and any overwatch shots have been taken, but before the combat is resolved. All the normal charge move rules apply, and defending formations must still be in a legal formation after the counter charge moves have been made (i.e., all units must be within 5cm of another unit from their formation). Embarked units may dismount.
A unit must use their counter charge move to move directly towards the closest enemy unit. It may move into base contact if close enough, and as long as the enemy is not already in contact with two defending units. Units can choose not to counter charge if they wish, but if they do counter charge they must head towards the nearest enemy.
Counter charging units are allowed to counter charge enemy units from any enemy formation, not just the one they were assaulted by. Any enemy formations that are contacted by counter charging units are drawn into the assault, and will fight just as if they had made the assault themselves. Treat them and the original attacking formation as a single formation for all rules purposes for the duration of the assault.
A 2D6 roll is used to resolve a combined assault. If the attacker loses then each formation is broken. If the attacker wins then each formation receives a number of Blast markers equal to the number of units the formation lost in the assault.
Resolve Attacks
All units have two assault values: a close combat value and a firefight value. Units that are in base-to-base contact with the enemy use the close combat value, while units that are not in base contact but are within 15cm and have a line of fire to the enemy can use their firefight value. Units that are armed only with close combat weapons and do not have any small arms or other ranged weapons may only attack if in base contact with the enemy.
Roll 1D6 for each unit that may attack. Note that Blast markers do not suppress units from formations involved in an assault—it is assumed that the proximity of the enemy means that everyone joins in! Compare the dice roll to the unit’s close combat value if it’s in contact with the enemy, or its firefight value if it’s within 15cm of the enemy but not in base contact. If the dice roll is equal to or greater than the relevant value, then a hit is scored on the enemy. No modifiers ever apply to these dice rolls.
Each player allocates the hits and make saving throws in the same manner as they would when allocating hits from shooting. Hits may only be allocated to units that were directly engaged in the combat (i.e., that belonged to the attacking or defending formation and which were within 15cms of the enemy after charge and counter-charge moves were completed). Infantry units from formations taking a charge action may not take cover saves (they are assumed to have left cover to charge the enemy), but other infantry units may take cover saves normally.
If all of the units in the defending formation have been killed and at least one attacker survives, then the attacker wins and the assault is over (go straight to Lower Withdraws). If all of the attacking units directly engaged in the assault are killed then the assault has stalled and the defender wins (go straight to Lower Withdraws). Directly engaged
means being within 15cm of a defending unit after charge and counter-charge moves have been completed. If even one of the original attackers that were within 15cms of the enemy survives, then the attack has not stalled. In any other case, both sides can call on support (see Supporting Fire).
Important Note: Kills inflicted in an assault do not count for placing blast markers or for breaking a formation until after the result of the combat has been worked out. Also note that the attacker must completely destroy the defending formation to win at this stage, while all the defender has to do is to kill all the attacking units that made it to within 15cms of a defender.
Supporting Fire
Both sides may call upon support unless the defender has been wiped out or the attack stalled as described above. Calling on support allows units from other formations to attack with their firefight value if they are within 15cm and have a line of fire to an enemy unit directly involved in the assault. In this case directly involved
means belonging to the attacking or defending formation(s) and in a position to attack. This rule represents units from both sides that are not directly involved in the assault lending supporting fire when they see their friends coming under attack. Units from formations that are either Broken or Marched this turn cannot lend support.
Roll to hit using the firefight values of the supporting formations, and then allocate hits and make saving throws as you would do for shooting attacks. Once all casualties have been removed you must work out the result of the attack (see Work Out Result).
Work Out Result
After both players have removed casualties, the outcome of the combat must be decided.
First, if one side completely wiped the other side out, then it is the winner. If this isn’t the case then each player rolls 2D6, and adds any modifiers that apply from the chart below to the single D6 that rolled highest. Note that you don’t add your dice rolls together, but use the single dice with the highest score. Whoever has the higher score after any modifiers have been added wins the assault.
In addition, the losing formation suffers a number of extra hits equal to the difference between the two sides’ result scores. There are no saves for these hits, which represent units being hacked down as they turn and run, or disintegrating into a panic-driven rout as they flee. Remove these additional casualties as you would hits inflicted in the assault phase (i.e., units in base contact first, then those closest to the enemy, etc.).
In the case of a tied dice roll fight a second assault using any surviving units, starting with step 4 (i.e. roll dice, allocate hits, make saves and resolve the combat all over again with any survivors). Units from both sides are allowed to make a counter charge move before the second round is fought, with the attacker moving his counter charging units first (see Counter Charges). If a second round is fought then any casualties from the first round carry over when working out the result of the combat.
| For each kill you have inflicted during the assault | +1 |
| You have more units than the opposing formation | +1* |
| You have more than twice as many units as the opposing formation | +1* |
| Your formation has no Blast markers | +1** |
| The opposing formation has more Blast markers | +1** |
|
* Count the total number of units remaining in the charging formation against the total number of units remaining in the defending formation. Don’t include units from other formations that were lending supporting fire. ** Count broken enemy formations as having as many Blast markers as units. |
|
Loser Withdraws
After the result of the combat has been worked out (either because all defending units were destroyed, or the attack stalled, or through a result roll), then the loser is broken and must withdraw, and formations on the winning side receive Blast markers for the casualties they suffered.
If the loser was already broken when it was assaulted then the whole formation is destroyed, and all units in the formation are removed from play as casualties. If the losing formation is not broken then it becomes broken and may withdraw (see Withdrawals).
Once any additional casualties have been removed, any surviving units on the losing side must make an immediate withdrawal as explained in the rules for broken formations later on (see Withdrawals).
Finally, any formations belonging to the losing side that were in a position to have lent support (i.e., they were within 15cms of an enemy unit in the assault) receive one Blast marker each, even if they did not actually lend support. These Blast markers represent the detrimental effect on morale of seeing friends defeated in an assault.
Winner Consolidates
After the loser has withdrawn, the winning formation receives a number of Blast markers equal to the number of units that were killed by the enemy. Note that it is possible for a formation to win an assault and then become broken by the casualties that they suffered! In this case, the winning formation is broken, but does not have to make a withdrawal even if other enemy units are within 15cm (see Withdrawals). If the winner of the combat was already broken at the start of the combat, they do not receive any additional Blast markers.
Any units on the winning side may then move 5cm. This is a free bonus move designed to allow attacking units to occupy territory they have captured. Units may not enter an enemy’s zone of control when they consolidate.
Intermingled Formations
Occasionally an attacker will wish to attack a position where units from two enemy formations are intermingled together. When a player declares the target for a charging formation he can choose, if he wishes, to include any enemy formations that are intermingled with the target formation as being part of the target of the charge. Two formations are intermingled if they have any units within 5cm of each other. If there are two or more formations within 5cm of the target formation, then the attacker can choose to include one or more of them as the target, he does not though have to include any of them.
For the purposes of the assault, the intermingled formation is treated as being a single formation. All of the intermingled formations are allowed to make counter charges, and hits may be allocated to all of the formations involved. Once casualties have been worked out, a 2D6 roll is used to resolve the assault. Add together all of the Blast markers on the intermingled formations when working out the result of the assault. If the defender loses then each formation is broken and must withdraw. If the defender wins then each formation receives a number of Blast markers equal to the number of casualties it suffered in the combat (i.e., if one defending formation lost two units and then another one, then the first would get two Blast markers and the other would receive one Blast marker).
Regrouping & Broken Formations
Formations that take a marshal action are allowed to regroup in order to remove Blast markers and attempt to avoid becoming broken. Formations are broken once they have received a number of Blast markers equal to the number of units in the formation, or if they lose an assault. Broken formations may not be selected to take an action in the Action phase.
Regrouping
Formations that take a marshal action may regroup. Roll 2D6 and remove a number of Blast markers equal to the highest roll. Note that the dice are not added together; instead the score of the higher dice is used.
Becoming Broken
Check to see if a formation is broken after it receives any Blast markers (either from failing an Action test, shooting or winning an assault). Formations that lose an assault are automatically broken. You should completely resolve an assault or an attacking formation’s shooting before checking to see if the target formation breaks (i.e., don’t break a formation that comes under fire until all of the shooting has been resolved).
Remove all of the Blast markers from a formation when it breaks, and mark it in some way to show that it is broken. You can mark a broken formation in any manner you like; some players simply remember, others turn units in a broken detachment away from the enemy, or you can use the Order Dice or Battle Markers produced by Games Workshop. At the end of the day, as long as you remember which formations are broken and which are not then any method will do.
Withdrawals
Unless the rules state specifically otherwise, a broken formation may choose to make a withdrawal immediately after the action that caused it to break has been resolved. If a formation is broken part way through an action that it is taking (i.e., by the Blast marker received for failing an initiative test, or as a result of Blast markers received from overwatch fire), then it makes a withdrawal and loses the rest of its action.
A formation making a withdrawal may make two moves. Withdrawal moves may be made in any direction, but if a unit ends the second withdrawal move within 15cm of the enemy, it is destroyed (it is killed while trying to escape!). Units may ignore enemy zones of control while making a withdrawal move but may not move directly over enemy units. These changes aside, withdrawal moves are treated exactly like a normal move. Enemy formations on overwatch can shoot at formations making withdrawal moves.
Units with a speed of 0cm obviously cannot move when making a withdrawal, so are destroyed if there are any enemy units within 15cm at the point they become broken.
Blast Markers and Broken Formations
Broken formations count as having as many Blast markers as units for any rules purposes.
Broken formations do not receive Blast markers after they have been broken and before they rally. Instead each Blast marker that the formation would normally receive causes an additional hit on the formation, with no saving throw allowed. Apply these extra hits as you would from normal shooting (i.e., from front to back of the formation). These additional hits represent individual units panicking and fleeing the battlefield, and they make broken formations extremely vulnerable to enemy attack—you have been warned!
Remember that a broken formation that wins an assault does not receive any Blast markers for the casualties it suffered, and will not therefore lose any additional units due to panic. It is assumed that in this case, the feeling of triumph at winning the assault overcomes any feelings of terror or fear.
The End Phase
The End phase takes place, unsurprisingly, at the end of the turn, once both players have taken an action with each of their unbroken formations. Both players must attempt to rally any formations and then check the scenario victory conditions to see if either side has won.
Rallying Formations
In the End phase both players take turns to rally formations that have Blast markers or that are broken. Rally the formations one at a time, starting with the player with the higher strategy rating. In order to rally a formation you must roll equal to or over the formation’s initiative value on a D6 (see Initiative Values). There is a -2 modifier to the dice roll if the formation is broken, and a -1 modifier if enemy units are within 30cm of a unit from the formation.
If the test is failed, then broken formations must make a withdrawal (see Withdrawals), while formations that are unbroken must remain in place but may not remove any Blast markers.
If the test is passed then remove half the Blast markers from the formation, rounding fractions up. Formations with one Blast marker remaining that pass a Rally test remove the last Blast marker. A broken formation that rallies is no longer broken. It counts as having as many Blast markers as units, half of which will be removed for passing the Rally test. For example, a broken formation with seven units that rallied would no longer be broken and would receive three Blast markers.
| Formation is broken | -2 |
| There are enemy units within 30cms | -1 |
| Modifiers are cumulative. | |
Check Victory Conditions
Most games of Epic are played using a scenario that will have a set of victory conditions that a player needs to achieve in order to win. See the special rules for scenarios in the special rules section for more details on how this works.
Rounding
In Epic, all fractions are rounded up unless the rules specifically say otherwise. Generosity rules where 6mm soldiers are concerned!
Core Rules Training Scenarios
Only faith in the Emperor and the training I am going to give you will save you on the battlefield.
You have now read all you need to know in order to try out the following training scenarios. A scenario is basically a set of notes, telling you all you need to know about the battle you are going to fight. It will tell you what forces are involved, what vehicles each player has, what each side’s objectives are, and so on.
In order to play the core rules training scenarios you will need to get hold of a couple of dozen units of Epic scale Space Marines. It will help if you can track down some Predator Destructors and Rhinos too, but these are not vital. There is a free downloadable file on the NetEA website which has a set of counters for the Space Marine units and vehicles used in the scenarios, so if you have access to the internet you can try out the first two scenarios even if you don’t have the correct models. Datasheets for the units can be found in the Forces section (see Forces).
In order to play the scenarios that follow, you will also need a small amount of gaming terrain. You can use Warhammer or Warhammer 40,000 hills and trees if you don’t have any in Epic scale, or just lay a cloth over some books to create rolling, hilly terrain.
Note: The datasheets for these five scenarios are in Section 5.0.
Basic Training Scenario
Even Space Marines need to practise their tactics and strategy. This basic training scenario is based on one of these exercises and pits Space Marines from the same Chapter against each other in a simple training exercise. The object is to take and hold an objective.
- Force Alpha
- Two formations each with six Space Marine Tactical units. The force has a strategy rating of 5 and all formations have an initiative value of 1+.
- Force Beta
- Two formations each with six Space Marine Tactical units. The force has a strategy rating of 5 and all formations have an initiative value of 1+.
- Gaming Area
- Set up a playing area approximately 60–90cm square. Set up any scenery you have in a mutually agreeable manner. You can set up as much or as little scenery as you like, but try to make sure that you have at least a couple of hills and either a built-up area or some woods for the troops to hide behind or take cover in. Place an
objective counter
in the very centre of the battlefield (a coin will do just fine). - Deployment
- If one player set up the scenery then his opponent can choose which table edge to deploy on. If you set up the scenery together then roll dice to see who gets the choice of edge. The other player sets up on the opposite table edge. You must deploy all of your units within 15cms of your table edge.
- Special Rules
- All Space Marine units may use the They Shall Know No Fear special rule (see They Shall Know No Fear).
- Victory Conditions
- You capture the objective if you have a unit within 15cms of it in the end phase and your opponent does not. To win the game, you must capture the objective and hold it for one full game turn.
Fast Attack Training Scenario
Space Marine armies are highly mobile and make great use of armoured transport vehicles to strike at the enemy with lightning speed. By far the most common Space Marine transport vehicle is the ubiquitous Rhino, a sturdy and reliable machine capable of transporting ten fully equipped Space Marines across the battlefield.
- Force Alpha
- Two formations each with six Space Marine Tactical units and three Rhinos. The force has a strategy rating of 5 and all formations have an initiative value of 1+.
- Force Beta
- Two formations each with six Space Marine Tactical units and three Rhinos. The force has a strategy rating of 5 and all formations have an initiative value of 1+.
- Gaming Area
- Same as Basic Training (see Basic Training Scenario).
- Deployment
- Same as Basic Training (see Basic Training Scenario).
- Victory Conditions
- Same as Basic Training (see Basic Training Scenario).
- Special Rules
- Same as Basic Training (see Basic Training Scenario).
Armoured Training Scenario
Space Marines make use of a number of different types of armoured fighting vehicle. Among the most common is the Predator Destructor, a nicely balanced fighting machine with weapons suitable for engaging both armoured and vehicle targets. This scenario is based on the training exercises used to teach Space Marines the skills required to work as a member of the crew of a Predator tank.
- Force Alpha
- Two formations each with four Space Marine Predator Destructors. The force has a strategy rating of 5 and all formations have an initiative value of 1+.
- Force Beta
- Two formations each with four Space Marine Predator Destructors. The force has a strategy rating of 5 and all formations have an initiative value of 1+.
- Gaming Area
- Same as Basic Training (see Basic Training Scenario).
- Deployment
- Same as Basic Training (see Basic Training Scenario).
- Victory Conditions
- Same as Basic Training (see Basic Training Scenario).
- Special Rules
- Same as Basic Training (see Basic Training Scenario).
Advanced Training Scenario
Space Marine armies include a number of specialised formations and troop types such as Space Marine Assault units equipped with Jump Packs, and Space Marine Devestators equipped with additional heavy weapons. This scenario is based on the advanced training missions used by the Space Marines to show how the presence of these units affects the tactics learned during basic training.
- Force Alpha
- Two formations each with six Space Marine tactical units and three Rhinos, plus one formation of four Space Marine Assault units. The force has a strategy rating of 5 and all formations have an initiative value of 1+.
- Force Beta
- Two formations each with six Space Marine tactical units and three Rhinos, plus one formation of four Space Marine Devastators. The force has a strategy rating of 5 and all formations have an initiative value of 1+.
- Gaming Area
- Same as Basic Training (see Basic Training Scenario).
- Deployment
- Same as Basic Training (see Basic Training Scenario).
- Victory Conditions
- Same as Basic Training (see Basic Training Scenario).
- Special Rules
- All Space Marine units may use the They Shall Know No Fear special rule (see They Shall Know No Fear), and Assault Marines may use the Jump Packs special rule (see Jump Packs).
Combined Arms Training Scenario
In most circumstances, a Space Marine commander will field a combined arms force. This scenario teaches the vital skills needed to weld infantry, artillery and armoured vehicle formations into a single fighting force.
- Force Alpha
- Two formations each with six Space Marine tactical units and three Rhinos, plus one formation of four Space Marine Assault units, one formation of four Predator Destructors, and one formation of three Whirlwinds. The force has a strategy rating of 5 and all formations have an initiative value of 1+.
- Force Beta
- Two formations each with six Space Marine tactical units and three Rhinos, plus one formation of four Space Marine Devestator units, one formation of four Predator Destructors, and one formation of three Whirlwinds. The force has a strategy rating of 5 and all formations have an initiative value of 1+.
- Gaming Area
- Set up a playing area approximately 90–120cm square. Set up any scenery you have in a mutually agreeable manner. You can set up as much or as little scenery as you like, but try to make sure that you have at least a couple of hills and either a built-up area or some woods for the troops to hide behind or take cover in. Place an
objective counter
in the very centre of the battlefield (a coin will do just fine). Then each player must set up another objective 45cms away from any other objective. There should be a total of three objectives once they have all been set up. - Deployment
- Same as Basic Training (see Basic Training Scenario).
- Victory Conditions
- You capture the objective if you have a unit within 15cms of it in the end phase and your opponent does not. To win the game you must capture two objectives and hold them both for one full game turn at the same time.
- Special Rules
- Same as Advanced Training (see Advanced Training Scenario).
Specialist Units & Weapons
We’re safe ’ere Gobbitz. There’s no way da beakies can get to us at the top of dis cliff…
The battlefields of the 41st Millennium are home to a vast array of extraordinary units and weapons. These can range from infantry units equipped with jump packs that allow them to fly through the air, through to heavily armoured vehicles equipped with huge macro-weapons so powerful they make a mockery of all but the very thickest armour. These kinds of units have special abilities that often break the core game rules in some way—troops with jump packs can leap over impassable terrain, for example, while units hit by macro-weapons do not get an armour save, and so on. These rules are not particularly complex and you can start using them more or less straight away. We have simply separated them off here so that they do not clutter up the core game rules.
Specialist abilities represent unique attributes for a unit or weapon. Because of this, abilities are not transferable to other units or weapons in the same formation. For example, Terminators are allowed to teleport onto the battlefield and this ability is listed in their profile in the Forces section of the rulebook. However, any other non-Terminator units in the same formation would not have this ability.
Sometimes situations will occur where some units have a special ability and others do not, raising the question of whether the ability may be used. For example, some units in a formation may be able to fire a barrage that ignores cover or has the macro-weapon effect, while other weapons taking part in the barrage do not. If such a situation occurs in a battle then you may only use the ability if all of the units taking part can use it—so the barrage would only ignore cover or count as a macro-weapon if all of the units participating in the barrage had these abilities.
Finally, unless the rules specifically state otherwise then any special abilities can be used by units belonging to a broken formation. Thus a supreme commander, for example, could still use his special abilities even if he was broken.
Specialist Units
Some units have special abilities that allow them to buck the rules
in some way. This is usually because the units themselves are unusual due to their training, equipment or temperament. Any special abilities that apply to a unit will be noted on its datasheet (see Unit Datasheets).
Characters
Certain units are noted as being characters. These units represent important individuals rather than groups of soldiers or the crew of a vehicle or war engine. Because of this they are not represented by a separate model on the tabletop, and are instead added to another unit in the army. The unit the character is added to receives any weapons and abilities that the character has noted on their datasheet. For example, Space Marine Chaplains are characters that are armed with a Power Weapon (assault weapon, macro-weapon, extra attack (+1)), and have the invulnerable save and inspiring abilities. Any unit they are added to will count as having all of these things in addition to their normal weapons and abilities. Note that characters can be added to any type of unit, including vehicles and war engines.
The unit and the character must operate together throughout the entire battle. The character can be transported in any vehicle allowed to transport the unit that he joins, and does not take up an extra space. The character should be represented by a suitable model or command banner that is added to the unit he joins. Characters that are taken as an upgrade for a formation must be added to a unit from the formation they were taken as an upgrade for.
Commanders
Some units and characters are noted as being commanders. Commanders can order up to three formations of troops to follow them when they make an assault, as long as all the formations have at least one unit within 5cm of a unit from the commander’s formation.
Make a single initiative roll for all the formations, counting a -1 modifier if any have Blast markers. If the test is failed then the commander’s formation receives a Blast marker and must take a hold action, but the other formations are unaffected (and may take an action later in the turn).
If the test is passed then all three formations may take an engage action. Treat the three formations as if they were a single formation for all rules purposes for the duration of the assault. A 2D6 roll is used to resolve a combined assault. If the attackers lose then each formation is broken. If they win then each formation receives a number of Blast markers equal to the casualties it suffered in the combat.
Fearless
Some units are noted as being fearless. Such units are either exceptionally brave or so crazed that they will never run away even when broken (though you can choose to have them make a withdrawal move if you want them to).
Units that are Fearless are immune to damage from losing an assault (both the additional hits and being wiped out if already broken) and from the damage inflicted by Blast markers if broken. When broken or otherwise forced to take a withdrawal move, Fearless units may choose not to withdraw, and if the unit elects to withdraw it will be destroyed only if it ends its move within 5cm of the enemy rather than 15cm. Fearless units that remain stationary do not take additional damage. Note that other units in the formation that are not fearless will be affected normally by additional hits for Blast markers or losing an assault or whatever—just don’t allocate any of the hits to the units that are immune, but hand them out as normal to units that are not.
Fearless units still count as part of a formation, and so will sometimes be dragged along
as their formation withdraws even though they don’t have to, simply in order to stay in formation (see Formations). Finally, note that not needing to withdraw can mean that fearless units can end an assault still in an enemy zone of control, or even in base-to-base contact with the enemy (see Zones of Control for details of how to deal with situations where units start an action in an enemy zone of control).
Infiltrators
Some units are noted as being infiltrators. These are allowed to double their speed when they make a charge move (and only when they charge!), and they can also ignore enemy zones of control from the formation they are charging. These two special abilities allow them to sneak past enemy units when they charge in order to attack enemy units that are further back. Note that the unit coherency rules still apply to infiltrators.
Inspiring
Some units or characters are noted as being inspiring. Each inspiring unit involved in an assault adds +1 to the result roll (as long as it survives the combat of course!)
Invulnerable Saves
Certain units or characters receive a special invulnerable save. These units either have protective devices or supernatural vitality that will allow them to survive an attack that would kill another creature. To represent this, units with an invulnerable save receive a second save of 6+ if they fail their first save for any reason. They may take this second save against any form of attack, even attacks that would normally not allow a save to be taken. No modifiers ever apply to the second save.
Jump Packs
Some units are noted as having jump packs. These units are equipped with special devices that allow them to fly for short distances, usually in a series of long hops
.
Units equipped with jump packs may ignore dangerous or impassable terrain as they move (they jump over it). They may not land on impassable terrain, and if they land in dangerous terrain they must take a dangerous terrain test. Units equipped with jump packs may also move over other friendly units as they move, but may not land on them. Units with jump packs are affected by enemy units and zones of control normally, and cannot jump over enemy formations.
Leaders
Some units or characters are noted as being leaders. A formation that includes any leaders may remove one extra Blast marker for each leader whenever it regroups or successfully rallies.
Light Vehicles
Light vehicles include any unarmoured vehicles where the crew is exposed to enemy fire, such as Ork buggies and Space Marine Land Speeders. The only difference between light vehicles and armoured vehicles is that light vehicles can be affected by AP fire as well as AT fire; in effect they count as infantry targets against AP fire and armoured targets against AT fire.
Light vehicles rely on speed and agility to protect them from enemy fire, and because of this their saving throw is based on these factors rather than the thickness of any armour they may carry. This aside, their saving throw works in exactly the same manner as the saving throw of any other unit, and will be ignored by macro-weapons, can be used against barrages, and so on.
Mounted
Some infantry units are noted as being mounted, and will either ride on bikes or living creatures such as horses. Mounted units count as vehicles for terrain effects, and as infantry units for all other purposes.
Reinforced Armour
Units with reinforced armour are protected by armour many times thicker than that found on most armoured vehicles and have extremely robust internal construction too. Because of this they still take their saving throw when hit by macro-weapons (see Macro-Weapons). In addition, they may re-roll a failed save against any non-macro-weapon hit, including those inflicted during an assault.
Scouts
Some units are noted as being scouts. These units are trained to operate on their own, scouting ahead of their formation to seek out the enemy. Scout units only have to remain within 20cm of another unit from their formation, rather than 5cm as would normally be the case. In addition, scouts are trained to spread out so they can cover a wide area, and so have a 10cm zone of control. Note that these abilities only apply to scout units and cannot be transferred to other units in the same formation or transport units carrying the scouts.
Skimmers
Some units are noted as being skimmers. These units are equipped with devices that allow them to hover a short distance above the ground, so that they can fly over terrain that would slow other units down. Note that skimmers do not follow any of the rules for aircraft in Section Aerospace Operations.
Skimmers may ignore dangerous or impassable terrain as they move. They may not land on impassable terrain, and if they land in dangerous terrain they must take a dangerous terrain test. Skimmers may also move over other friendly units as they move, but may not land on them. Enemy units and zones of control affect skimmers normally.
A skimmer may declare that it is popping up at the start of any action that it takes, including when the skimmer goes into overwatch. A skimmer may not pop up as part of a sustained fire action or a marshal action, but may pop-up when it goes onto overwatch. Popping up counts as movement for the purposes of triggering firing by enemy units on overwatch.
A skimmer that has popped up, pops down
at the conclusion of the action. Skimmers on overwatch do not pop down until after they make their overwatch attack. Skimmers with a transport capacity may not embark or disembark units while they are popped up, and if they are destroyed while they are popped up then any units on board will be destroyed with no save.
A skimmer that has popped up is assumed to be flying high enough that nearby intervening terrain that is closer to the skimmer than the target does not block the line of fire. To check if the line of fire is blocked, simply measure the distance between the skimmer and the terrain, and then measure the distance between the terrain and the target unit. If the skimmer is nearer to the intervening terrain then the line of fire is not blocked. If the skimmer is further from the terrain, then work out the line of fire normally. If the distance is is equal, then both the skimmer and the target unit can fire at each other, but they both count as being in cover and the cover to hit modifier will apply.
Skimmers may always choose to use their firefight value in an assault, even if there are enemy units in base contact with the skimmer. If they do this then the enemy must use their firefight value also. This represents the skimmer lifting off the ground out of reach of enemy ground units.
Sniper
Some infantry units are noted as being snipers. Roll separately when attacking with a sniper unit. If they hit, the attacker can choose which enemy unit is hit from those within range and in the line of fire of the sniper unit. In addition the target suffers a -1 save modifier.
Supreme Commanders
Supreme Commanders represent high-level command units. They count as commanders and leaders (see Commanders and Leaders respectively). In addition, each supreme commander unit in the army allows a player to re-roll one failed initiative test (of any type) once per turn.
Thick Rear Armour
Some armoured units are noted as having thick rear armour. These vehicles have equally thick armour all round, and so ignore the -1 save modifier when they are caught in a crossfire.
Teleport
Units with the teleport ability can appear suddenly on the battlefield, either because they have access to technological or arcane devices that allow them to be instantaneously moved from one place to another, or because they are capable of hiding extremely well and then suddenly appear as if from nowhere
.
Formations where all of the units have this ability may be kept off the table, and can appear at the start of any turn. Simply place the unit anywhere you like on the table at the start of any turn, before determining who wins the strategy roll. The unit must be placed within 5cms of another unit from its own formation if there are any already in play. So, for example, if a whole formation teleported into play then the first unit could be placed anywhere, but any other units would need to be placed within 5cms of a unit that had already been placed. All units must be placed outside enemy zones of control. If placed in dangerous terrain then a dangerous terrain test must be taken when the unit is placed on the table.
Teleporting is an inherently dangerous business, and doesn’t always go as planned. To represent this roll a D6 for each unit that teleports into play. On a roll of a 1 the formation that the unit belongs to receives a Blast marker.
Walkers
Some vehicle units are noted as being walkers. They are able to negotiate dangerous terrain more easily than other vehicles. To represent this they may re-roll any failed dangerous terrain tests.
Re-rolls
Sometimes the rules will allow you to re-roll a dice if you don’t like the first score you rolled. Re-rolls always apply to single dice rolls—if you rolled more than one dice then the re-roll will only allow you to re-roll one of them unless the rules specifically say otherwise. No dice may be re-rolled more than once (you can’t re-roll a re-roll) and you must accept the result of the second roll.
Slow and Steady
Some spacecraft units are noted as being slow and steady. They may not be used on the first two turns of a battle unless the scenario specifically says otherwise.
Support Craft
Support craft are much like a hybrid between a skimmer and an aircraft. They remain high up in the air, hovering over the battlefield, firing over intervening terrain when possible. Support craft function identically to a skimmer unit that is always popped up
. Support craft fire and are fired at normally (i.e. anti-aircraft ability is not required). In an assault, support craft automatically force a firefight in the same manner skimmers may choose. It is assumed that support craft transports or the troops they carry are appropriately equipped to embark and disembark troops as normal.
Self Planetfall
Self planetfall is plotted exactly as planetfall (see Planetfall). Both the turn in which the formation arrives and the landing location is plotted. The only exception is that, because these units are much smaller than orbiting spacecraft, they may be plotted to arrive in the same turn that an enemy spacecraft is present.
On the designated turn the self planetfalling unit is activated in the normal activation sequence, as with spacecraft. Nominate the action for the formation and roll to activate. If the unit fails to activate its arrival is delayed to the next following turn. If the activation is successful, place the formation at the plotted landing zone and determine scatter according to Planetfall as if it were a normal planetfall, including loaded units disembarking up to 5cm. The formation’s action proceeds as normal in all respects from that point. In other words, the formation gets the free move
from planetfall placement at the beginning of its action but in all other ways activates as normal.
Note: The action is chosen at activation, before scatter is determined. Choose the action carefully as a poor scatter role could render some actions ineffective.
Expendable
Some units are seen by their allies as ablative or just plain disposable. This may be because the units are specifically created to sacrifice themselves or because the units are simply not valued.
A formation does not receive a Blast marker when a unit with expendable is destroyed, this includes the extra Blast marker from the first casualty of a crossfire and for units destroyed for being out of formation after a move.
If an expendable unit is hit by a weapon with disrupt it does not inflict a Blast marker. If a formation is comprised completely of expendable units then they do not benefit from any of the rules above.
Expendable units killed in an assault count for the purposes of working out its result (see Work Out Result).
Tunneler
Formations where all of the units have tunneler (or are transported in units that have the ability) may be kept off the table and can appear at the start of the second turn or after. Set up the units touching their own side’s table edge before the battle starts at the same time that spacecraft are setup (see Planning Spacecraft Operations). Any units transported in the tunneler should be placed to one side at this time too.
Secretly write down the location where the tunneler will surface at the same time and in the same manner that you record the coordinates of a drop zone (see Planning Spacecraft Operations). You must also secretly record when the tunneler will surface. If it is going to surface in your half of the table it may arrive from the second turn onwards. If it is going to surface in the opposing half of the table, it may arrive from turn three onwards.
Set up the tunneler at the start of the stated turn, before placing units with teleport, at the location you wrote down. Any units being transported are allowed to disembark immediately upon surfacing. Surfacing does not count as movement for the purposes of triggering overwatch fire. Disembarking triggers overwatch fire as normal.
If the tunneler surfaces on terrain that is impassable for it, under a friendly unit, or in an enemy zone of control then it is assumed that on-board sensor equipment will divert it towards another entry point. The unit should be moved by the opposing player to the nearest area where it can surface.
Formations of multiple tunneler need only record one location where they will surface. Place a unit at this location, or within 5cm of another unit that has already been placed, so long as all units are placed within 15cm of the location and on the appropriate half of the table.
Tunneler, and any units being transported in them, may take an action on the turn they appear.
Self-Reliant
Some units or characters are noted as being self-reliant. A formation that includes one or more self-reliant units may remove one extra Blast marker whenever it regroups or successfully rallies. Multiple self-reliant units in a formation does not allow it to remove multiple Blaster markers, simply check for the presence of one or more self-reliant units and remove one Blast marker if they are found.
Some self-reliant units may have a trailing number noted in parentheses (e.g. self-reliant (x)). If this is the case, remove a number of Blaster markers equal to x
instead (e.g. a formation of self-reliant (2) units would remove two Blast markers instead of one). If a unit has multiple self-reliant abilities then use the one with the greatest number and ignore the rest. Similiarlly, if a formation contains units with different self-reliant abilities then use the one with the greatest number and ignore the rest.
Specialist Weapons
Some exotic or powerful weapons have special abilities to represent their unique properties. Any special abilities that apply to a weapon will be noted in the line for the weapon on a unit’s datasheet.
Anti-aircraft Weapons
Some of the weapons used in Epic are used in dogfights or to defend against aircraft. These weapons are collectively known as anti-aircraft weapons in the rules. Anti-aircraft weapons have an AA
firepower value, in addition they may also have AP or AT firepower values. For example, the Space Marine Hunter has a Firepower value of AT4+/AA4+. The rules for carrying out AA shooting are described in full in the rules for Aerospace Operations (see Aerospace Operations).
Disrupt
Certain weapons are designed to disrupt enemy formations as much as kill enemy troops. To represent this weapons noted as having the disrupt ability inflict a Blast marker on an enemy formation for each hit they inflict instead of for each kill they inflict. Note that the hits inflicted by disruptor weapons are saved for normally. Any units that fail their save are removed as casualties but do not cause a second Blast marker to be placed on the target formation.
Extra Attacks
Some assault and close combat weapons are noted as having extra attacks (+x). Units armed with these weapons receive a number of extra attacks equal to x
during an assault. For example, an assault weapon noted as having extra attacks (+2)
would allow the unit using it to make two extra close combat attacks in an assault. Sometimes the entry will specify a dice roll rather than a fixed number. For example, a weapon that had extra attacks (D3)
would attack D3 times each time it attacked. Extra attacks can apply to shooting attacks, close combat attacks, and firefight attacks.
First Strike
Weapons with the first strike ability attack first in an assault. Resolve the attack and inflict damage for the weapon before any enemy units make their attacks. This may result in some enemy units being destroyed before they can attack. If the ability is noted for a weapon with extra attacks (see Extra Attacks) then only the extra attacks gets the first strike ability; otherwise it will count for all close combat attacks if noted for an assault weapon, or all firefight attacks if noted for small arms. If opposing units both have first strike weapons then all first strike attacks are resolved simultaneously and their results applied to both sides before other attacks are resolved.
Ignore Cover
Some weapons are noted as being able to ignore cover. These weapons are designed to negate the effects of cover, either by blasting it apart or simply bypassing it altogether. These weapons ignore cover to hit modifiers, and negate infantry cover saves.
Macro-Weapons
Some of the weapons used in Epic are absolutely huge. These weapons are collectively known as macro-weapons in the rules. Only units with reinforced armour or invulnerable saves receive a saving throw against hits from a macro-weapon (see Invulnerable Saves and Reinforced Armour). Any other type of target that is hit does not get a saving throw at all. The following rules explain in detail how this works, but as long as you bear in mind the principle that macro-weapons cancel saves then you won’t go too far wrong.
- Shooting Attacks
- Macro-weapons that can be used for shooting attacks do not have AP or AT firepower values. Instead they have a
macro-weapon
value (abbreviated to MW). For example, the volcano cannon mounted on an Imperial Warlord Titan has a fire value of MW 2+. You should roll to hit normally when firing a macro-weapon. Macro-weapons can affect any type of target, so the volcano cannon mentioned above would hit any type of target on a roll of 2+. Only units with reinforced armour or invulnerable saves receive a saving throw against hits from a macro-weapon (see Invulnerable Saves and Reinforced Armour). Any other type of target that is hit does not get a saving throw. Cover saves are also negated, although the -1 to hit modifier does apply. Units on board a transport vehicle destroyed by a macro-weapon only receive a save if they would have one were they hit by the macro-weapon directly. - Barrages
- Work out the macro-weapon’s barrage normally, except that any units hit do not receive a saving throw unless they have reinforced armour or an invulnerable save.
- Assaults
- In an assault, some small arms and assault weapons that are allowed extra attacks can have the macro-weapon ability as well. In this case the macro-weapon ability only applies to the extra attacks.
- Allocating Hits
- If an attacking formation scores hits both with normal weapons and weapons with the macro-weapon ability, then the opposing player must allocate and make any saves for the normal hits first, and then allocate and make any saves for the macro-weapon hits. Hits from macro-weapons can only be applied to units that are in a position to be hit by a macro-weapon.
Single Shot
Some weapons are noted as being single shot. These weapons may be used once per battle and may not then be fired again. You may want to record which single shot weapons have been fired on a piece of scrap paper.
Slow Firing
Some weapons are noted as being slow firing. These weapons must take one turn to reload after they have fired. This means that if they fire on one turn they may not fire during the next. We have found that the best way of remembering this is simply to turn the unit around to face away from the enemy when it fires, and then turn it back again when the formation is activated again next turn, but you can use any method you prefer.
Titan Killers
Some weapons are noted as being Titan Killers. Enemy units hit by such weapons may not take a cover or armour save, even if they have reinforced armour. In addition, further special rules apply if the target unit is a war engine (see War Engines). In all other ways, Titan killers are treated as macro-weapons.
Indirect Fire
Some weapons that can fire barrages are noted as having the indirect fire ability. Units armed with indirect fire weapons are allowed to fire indirectly if their formation takes a sustained fire action. Units belonging to a formation that fails the action test may shoot normally as part of their hold action, but may not fire indirectly. Units firing an indirect barrage receive the +1 modifier for taking a sustained fire action. In addition, no line of fire is required for an indirect barrage, as it is assumed that the barrage is fired high in the air so that the shots rain down on the target and ignore any intervening terrain. Co-ordinates for the barrage are provided by spotters
that are either in other friendly formations that do have a line of fire, or from orbiting spy satellites or planes. Finally, the high trajectory used by weapons firing indirectly greatly increases their range, but means they cannot fire at targets that are too close by. To represent this, weapons firing indirectly double their range, but have a minimum range of 30cms.
Specialist Training Scenarios
Why, if it isn’t Brother Marius. The injuries from the last training exercise have healed well I see. And that new bionic eye should prove most useful for this next exercise. Tell me, how many hours have you had on Land Speeders up to now?
There are a huge number of specialist units and weapons covered by the Epic rules, far too many to be covered in a single training scenario. However, the following variant of the Combined Arms training scenario can give you a taste of what effect specialist units can have on the game. In order to play the scenario you will need access to the models you used for the Combined Arms scenario, plus models for the units shown on the datasheet section below.
Note: The datasheets for this scenario are in Section 5.0.
Specialist Training Scenario
Space Marines are organised into companies led by hugely experienced and respected commanders, and backed up with heavily armoured Land Raiders and highly agile Land Speeders. These specialised units allow a force to be tailored to carry out any mission the company may be called upon to undertake.
- Force Alpha
- Two formations each with six Space Marine Tactical units and three Rhinos, plus one formation of four Land Raiders and one formation of five Land Speeders. One Tactical formation may include a Space Marine Commander and the other may include a Space Marine Dreadnought. The force has a strategy rating of 5 and all formations have an initiative value of 1+.
- Force Beta
- Two formations each with six Space Marine Tactical units and three Rhinos, plus one formation of four Land Raiders and one formation of five Land Speeders. One Tactical formation may include a Space Marine Commander and the other may include a Space Marine Dreadnought. The force has a strategy rating of 5 and all formations have an initiative value of 1+.
- Gaming Area
- Set up a playing area approximately 90–120cm square. Set up any scenery you have in a mutually agreeable manner. You can set up as much or as little scenery as you like, but try to make sure that you have at least a couple of hills and either a built-up area or some woods for the troops to hide behind or take cover in. Place an
objective counter
in the very centre of the battlefield (a coin will do just fine). Then each player must set up another objective 45cms away from any other objective. There should be a total of three objectives once they have all been set up. - Deployment
- If one player sets up the scenery then his opponent can choose which table edge to deploy on. If you set up the scenery together then dice to see who gets the choice of edge. The other player sets up on the opposite table edge. You must deploy all of your units within 15cms of your table edge.
- Special Rules
- All Space Marine units may use the
They Shall Know No Fear
special rule (see They Shall Know No Fear). - Victory Conditions
- You capture the objective if you have a unit within 15cms of it in the end phase and your opponent does not. To win the game you must capture two objectives and hold them both for one full game turn.
War Engines
How much like a god he is, that ancient machine, primal of all his kind! His mighty fists, massive like two towers of destruction, laden with the doom of mankind’s bitter foes. He watches over us now as battle joins, and in his shadow we shall advance upon our enemies and defeat them.
The battlefields of the 41st Millennium are home to some awesomely large vehicles, many of which tower high above the battlefield and carry weapons batteries of terrifying potency. Most famous of all of these are the Titans created by the Adeptus Mechanicus of the Imperium, but there are many others including the Gargants fielded by Ork armies and the living bio-Titans fielded by the Tyranids. All of these creations are referred to as war engines in the Epic rules.
War engines include all very large machines, such as Ork Gargants, Imperial Titans, Imperial Guard Baneblades and Space Marine Thunderhawk Gunships. Because of their huge size and awesome toughness, war engines are very different to other units, and because of this many of the core game rules are modified when it comes to war engines.
That said, the main difference between a war engine and a normal vehicle is that the war engine has a damage capacity (abbreviated DC) that shows how many kills
the war engine can absorb before it is destroyed. For example, a Warlord Titan has a DC of 8, and it therefore takes eight kills
to destroy it. For most rules purposes, a war engine counts as being worth
a number of units equal to its starting damage capacity, so a war engine’s starting damage capacity is also used to work out how many dice it rolls in an assault, how easy it is to pin and so on. This and all of the other modifications to the core game rules are described in detail as follows.
War Engine Movement
War engines follow the same movement rules as any other unit. War engines that fail a dangerous terrain test suffer a hit (see the damage rules below).
War Engine Formations
War engines are so large they usually operate as single units. Although only one unit, the war engine is still a separate formation, and all of the rules that apply to formations apply to it also.
Some smaller war engines like Baneblades operate in formations of more than one unit. War engines count as being within formation coherency distance if they are within a distance equal to their starting damage capacity × 5cm of another unit from the formation. For example, a Bandeblade has a starting damage capacity of 3, and so will be in formation as long as it is within (3×5) = 15cm of another unit.
War Engine Zones Of Control
War engines have a zone of control like any other unit. In an assault they only lose their zone of control once they have been charged by a number of units equal to their starting damage capacity.
Transport War Engines
Some war engines are capable of transporting other units. These war engines are an exception to the rule that transport vehicles may only carry units from their own formation. Instead a war engine transport vehicle can carry units from another formation, as long as the entire formation can fit inside the war engine, and as long as the entire formation mounts up as part of the same move. Note that a war engine may carry other units from its own formation using the normal rules (see Transport Vehicles).
For a formation to mount up in this way the units that are getting on board must be able to move into base contact with the war engine during their action. The war engine is allowed to have taken an action before the other formation mounts up, but may not take an action after they have done so. While being transported the units may not shoot or carry out any other actions except to rally in the end phase (see Rallying Formations).
Once the units being transported have mounted up, the war engine can move off with them inside as part of one of its own actions in a subsequent turn. It can dismount the transported units at the end of a move in the same way as a normal transport vehicle (i.e., the units are placed within 5cms of the transport at the end of a move).
Formations that dismount in this way may not take an action in the turn they dismount, but are allowed to either shoot or fight in an assault if the war engine that was transporting it is able to shoot or assault. In both cases, the war engine and the transported units are treated as a single formation until the shooting attack or assault has been resolved. The war engine and the formation that disembarked are treated as being separate formations once the war engine has completely resolved its action.
For example, a war engine could take a double action and disembark any troops it was carrying at the end of its move. The war engine and the disembarked units could then shoot together at a target formation, but all shooting would suffer the -1 modifier for shooting while taking a double action. Alternatively a war engine could take an engage action and dismount any transported units at the end of its charge move. It and the disembarking units would be treated as a single formation for the purposes of resolving the assault, as if they were making a combined assault (see Commanders, paragraph 3).
War Engine Shooting
The following special rules apply when shooting either at or with war engines. In general, war engines are treated in the same manner as armoured vehicle targets (i.e., any hit that would affect an armoured vehicle can affect a war engine). Any exceptions to this are noted below.
Allocating Hits To War Engines
Normally, you may only allocate one hit to a unit in a formation until all units in the formation have been allocated one hit each. This doesn’t apply to war engines. Instead, the defender allocates a number of hits equal to the war engine’s starting damage capacity before he allocates any hits to other units.
If a formation includes both war engines and non-war engine units then an attacker must state whether any attacks he makes on the formation will be directed at the war engines or the other units in the formation. Attacks directed at the war engines can only be allocated against war engines if they hit, while attacks directed at other units may not be allocated to the war engines in the formation.
Special rules apply to war engines that are attacked by weapons that use templates (see Barrages). Normally these weapons attack each unit that falls under the template once each. However, due to its huge size if a war engine lies directly under the centre of a template, then it is subjected to a number of attacks equal to half its starting damage capacity, rounding fractions up. For example, a Baneblade (DC3) caught under the centre of a template would be attacked twice. You may wish to make sure that your barrage templates have a small hole in the centre so that you can see if a war engine suffers the full effect of the bombardment or is only attacked once.
War Engine Damage Capacity
Unlike normal vehicles, war engines are able to absorb more than one hit before they are destroyed. The number of hits a war engine can take is shown by its damage capacity. Each hit that is not saved will reduce the war engine’s damage capacity by 1 point, and the war engine is only destroyed once its damage capacity is reduced to 0. Place one Blast marker on the war engine’s formation for each point of damage that it suffers.
Critical Hits
The weapons used in Epic are so destructive that they have the ability to destroy or damage even the largest target if they hit the right place. To represent this, any hit on a war engine (no matter how it was inflicted) has a chance of causing critical damage. Roll a D6 for each hit scored on a war engine. On a roll of 1–5 the target suffers normal damage and its damage capacity is reduced by 1 point. On a roll of a 6 the hit has caused critical damage; the war engine still loses one point of damage capacity, but in addition suffers a critical hit.
The effect of a critical hit is listed on the war engine’s datasheet and will vary from one type of war engine to another. For example, Imperial Titans are vulnerable to hits on their dangerously unstable plasma reactors, while Ork Gargants are renowned for catching fire, and so on.
If a war engine suffers more than one critical hit then the effects of all of the hits are cumulative.
Blast Markers
Every time a war engine loses a point of damage then the formation it is part of receives one Blast marker. If a war engine is destroyed by the effect of a critical hit then the formation it belongs to receives a number of extra Blast markers equal to the damage capacity the war engine would have had remaining were it not destroyed. For example, if a previously undamaged Baneblade in a Super Heavy Tank Company were destroyed by a single critical hit then the company would receive three Blast markers.
It requires a number of Blast markers equal to a war engine’s starting damage capacity to suppress or break a war engine. Add the starting damage capacity of any functioning war engines in a formation together in order to find out how many Blast markers are required to break the formation. If the formation includes units that are not war engines, then add the starting damage capacity of any functioning war engines in the formation to the number of other non-war engine units to find the formation’s break point. For example, an Ork formation with a Battlefortress (DC3) and six Boyz would be broken by 3+6 = 9 Blast markers. War engines rally using the normal rules.
A broken war engine is assumed to have a number of Blast markers equal to its starting damage capacity for all rules purposes. If there are any enemy units within 15cms of the war engine after it makes a withdrawal then it suffers one extra point of damage (no save allowed) for each enemy unit that is within 15cms. Additional hits caused by losing an assault or receiving Blast markers while broken cause one point of damage each. Roll for critical hits from these extra hits as you would normally.
Titan Killer Weapons
Some units are armed with weapons that are noted as being Titan Killers (see Titan Killers). Many of these weapons are capable of taking down a war engine with a single shot. Enemy units hit by such weapons may not take a cover or armour save, even if they have reinforced armour. Note that cover to hit modifiers do apply.
In addition, Titan Killer weapons will usually have a dice roll noted in brackets on their data sheet. For example, the Volcano Cannon mounted on an Imperial Guard Shadowsword is noted as being a Titan Killer (D3) weapon. If such a weapon hits a war engine then the war engine suffers damage equal to the roll of the appropriate sort of dice. Each point of damage will reduce the war engine’s damage capacity by 1 point. Roll for critical hits for each point of damage inflicted. Titan Killer weapons that do not have a dice roll in brackets only inflict one point of damage.
When allocating Titan killer hits that may cause multiple points of damage, roll for damage immediately after allocating the hit. The War Engine counts as having been allocated a number of hits equal to the damage rolled. This is solely for purposes of allocation. Damage is applied as normal, only after all hits have been allocated.
War Engine Assaults
War engines can be devastating in an assault, which is reflected by the following special rules.
Charge Moves
When a war engine charges it is allowed to barge
any non-war engine units belonging to the target formation out of the way and carry on with its charge move. Move the war engine as far as desired, and then place any units that were barged out of the way as close as you can to their starting point, while still touching the base of the war engine that so rudely pushed them aside. The maximum number of units a war engine can barge aside in this manner is two per point of its starting damage capacity. Note that war engines may not barge other war engines out of the way.
The rule that no more than two units may move into base contact with an enemy unit when they charge does not apply to war engines. Instead a war engine may be charged by up to two enemy units per point of its’ starting damage capacity (i.e., a Baneblade with a DC of 3 could be contacted by up to six enemy units).
Close Combat and Firefight Attacks
Instead of rolling a single hit dice for each war engine in an assault, roll a number of hit dice equal to the war engine’s starting damage capacity. You may choose to split these between close combat rolls and firefight rolls as you see fit, but close combat rolls will only hit enemy units in base contact, while firefight rolls will only hit units within 15cm that are not in base contact.
Result Rolls
When working out the result of an assault that includes a war engine, count each point of damage inflicted on a war engine as a casualty
. Each surviving war engine counts as a number of units equal to its starting damage capacity when working out if one side outnumbers the other. If a war engine loses an assault, then it takes one extra point of damage for each point it lost the assault by. Roll for critical hits normally.
War Engine Training Scenario
We’ve got our Gargantz an’ we’ve got our weapons. Wot ain't we got? We ain’t got anyfing for target practice iz wot! So I'll tell you wot we're gonna do. We’re gonna give da Humies a taste of ’ot metal death is wot. We’s gonna take Big Gork and Big Mork ’ere an’ we’s gonna stomp Hummie!
The following training scenario will allow you to quickly and easily try out war engines for the first time. We highly recommend playing the scenario before including war engines in any normal games, as so many special rules apply to war engines that including them in a full sized game without any practice will slow things down to a crawl.
If you play Korps Grinda Returns twice, once as each side, then you will gain a good grasp of the war engine rules and will easily be able to incorporate them into the games that you play.
Note: The datasheets for this scenario are on the next page and in Section 5.0.
Gogard’s Last Stand
Warlord Gogard led an ill-advised invasion of the Imperial planet of Belle Alpha about ten years before the Battle For Armageddon. Trapped by Blood Angels Space Marine reinforcements, and with most of his boyz dead or dying, Gogard boarded his trusty Gargant Korps Grinda and set off for one last suicidal attack on the hated beakies
. Gogard’s attack came as a complete surprise to the Blood Angels, who only managed to damage the Great Gargant before being forced to retreat from the awesome firepower of the war engine.
Gogard carried on until he reached the main Imperial defence line. Here the Imperial defenders were much better prepared and raked the Gargant with heavy weapons fire as it advanced. The Gargant krew struggled to contain the fires raging inside the war engine, and were able to do so just long enough to allow Korps Grinda to cause immense destruction to the defenders before a massive explosion in the hull destroyed the Gargant and Warlord Gogard once and for all.
Gogard’s last futile battle and glorious demise is a tale often retold around Ork campfires, with the result that a number of Ork Gargants on Armageddon are named Korps Grinda or a variation on the name (hey, nobody said that Orks were original!)
Korps Grinda Returns!
In a strange quirk of fate, one of the Gargants named Korps Grinda II found itself surrounded and cut off far behind Imperial lines, and was left with no option other than to try to inflict as much damage as possible before it was destroyed. The stage was set for a reprise of Gogard’s Last Stand!
- Ork Forces
- One formation consisting of Korps Grinda II, a Great Gargant (the datasheet is at the end of Section 5.5) The force has a strategy rating of 3 and all formations have an initiative value of 3+. The Mob Rule (see Mob Rule) and Power of the Waaagh (see Power of the Waaagh!) special rules apply to Korps Grinda II.
- Space Marine Forces
- One formation consisting of a Space Marine Commander, six Space Marine Tactical units and three Rhinos, plus one formation consisting of a Space Marine Commander and four Space Marine Devastator units, and one formation consisting of four Land Raiders. The force has a strategy rating of 5 and all formations have an initiative value of 1+. The
They Shall Know No Fear
special rule applies to all Space Marine formations (see Basic Training Scenario). - Gaming Area
- Set up the playing area approximately 90–120cm square, including the features shown on the accompanying map. Set up any further scenery you have in a mutually agreeable manner. The Space Marine player must set up two command bunkers when he deploys. These are the objectives of the Ork attack. They may be set up anywhere on the table that is at least 15cm from a table edge.
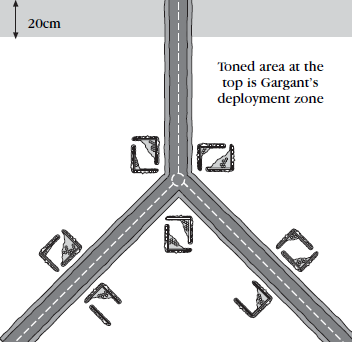
- Deployment
- The Space Marine player sets up first. One formation is deployed on the table, either in or touching the ruined buildings by the
Y
junction. The remaining two Space Marine formations enter play anywhere along the Space Marine table edge (including the roads) on the first turn of the battle. The Space Marine player must deploy one unit from each of these formations on the table edge to show where they will enter play. Their move on the first turn must be measured from this point. Once the Space Marines have deployed, the Ork Great Gargant may be set up as shown on the deployment map. - Victory Conditions
- The game carries on until Korps Grinda II is destroyed or both objectives have been demolished. If the Space Marines destroy Korps Grinda II without losing either bunker then they win the game. If one bunker is destroyed then the game is a draw, and if the Orks destroy both bunkers then they win.
- Damage Capacity 3
No units may enter the bunker as it is filled with comm’s gear.
Aerospace Operations
Krukfang pushed the control stick forward and steered Deffblasta down into a straffing run. The words of Gobstikk came back to him from when the Mekaniak had been teaching the young Krukfang how to fly. Long, uncontrolled bursts the clever Mek had taught him…
Most Epic armies are supported by aerial units that either operate in the atmosphere or from orbit in space. These units range from small fixed-wing aircraft with a single crewman, to gigantic spacecraft manned by thousands or even tens of thousands of crew. Aerospace units are very different to any other unit in Epic. They are very fast compared to the ground units described so far, being perfectly capable of flying onto and off the largest gaming table in a single turn. This sheer speed means that only specialised ground units or other aerospace units are capable of engaging them. In addition, aerospace units often carry an arsenal of highly destructive weapons which when combined with their high speed allows them to unleash devastating attacks at almost any point on the battlefield. Last, but not least, some aerospace units are capable of transporting ground units, hurtling onto the battlefield and delivering their cargo wherever they may be needed.
The rules for aerospace operations are one of the most complicated sections of the Epic rulebook. Because of this we recommend playing a few games without aerospace units before you try them out, and that you limit each side to very small numbers of aerospace units for the first few games that you do play with the rules. Diving in the deep end and using aircraft, drop pods and spacecraft in your first game is not recommended!
Aerospace Units
In Epic there are two types of aerospace unit:
- Aircraft
- The unit type includes all
fixed wing
aircraft that can operate in a planet’s atmosphere. Most aircraft are powered by powerful jet engines and are capable of carrying heavy payloads and of flying at thousands of kilometres an hour. Aircraft can range in size from small single-seat fighters to huge transport landers that can carry entire formations of troops. Aircraft belong to one of three manoeuvre classes that determine how easily they can turn when they move, as described below. The three classes are: Fighters, Bombers, and Fighter-Bombers. An aircraft’s manoeuvre class is noted instead of its speed on its data sheet. - Spacecraft
- This category includes all of the interstellar spacecraft used by armies to move from one star system to another. These craft can vary in size from small escorts to huge battleships armed with enough firepower to level a hive city! In Epic they are assumed to be operating from low orbit where they can land drop pods and provide long-range support for ground troops.
Aerospace Formations
Aerospace units are organised into formations just like any other unit. However, although aerospace formations do receive Blast markers, they cannot be broken or suppressed. In addition, they can’t be assaulted, lend support to an assault or be used by another formation to claim a crossfire, etc., while in the air. Once landed, an aerospace unit may be assaulted and be used in a crossfire, and is affected by Blast markers normally.
Aircraft
Aircraft formations are not set-up with other units. They are kept off table (where it can be imagined they are in orbit or stationed at a nearby airbase) but can be set up on the board when they take an action. Aircraft that are capable of transporting other units may be set up with the these units already on board. The aircraft (plus any units they are transporting) may only enter play using the following rules.
Aircraft formations can only take the following actions: Interception, Ground Attack, Combat Air Patrol or Stand Down. Aircraft formations that fail an action test must take a stand down action rather than a hold action.
- Interception
- Only fighters and fighter-bombers can choose this action. Take an action test for the formation and if it passes set up the formation touching your table edge. The formation may then make an approach move and then attack enemy aircraft units. In the end phase, the formation must make a disengagement move and exit the table.
- Ground Attack
- Take an action test for the formation and if it passes set up the formation touching your table edge. The formation may then make an approach move and then attack enemy ground units. In the end phase, the formation must make a disengagement move and exit the table.
- Combat Air Patrol (CAP)
- Only fighters and fighter-bombers can choose this action. Take an action test for the formation and if it passes set up the formation touching your own side’s table edge to show where it will enter play.
- A formation on combat air patrol may choose to carry out an interception action in reaction to an enemy ground attack. No initiative test is required to carry out the interception. It takes place after the enemy ground attack formation has made its approach move, but before flak is fired at the ground attackers or they make their own attack. Formations that are on CAP remain on CAP until they make an interception. If they haven’t made an Interception by the end of the turn, then they can either stand down and return to base normally, or remain on CAP into the following turn.
- No more than one formation that is on CAP may intercept a formation that makes a ground attack mission. In effect CAP allows you to interrupt an enemy ground attack action and
bounce
the enemy aircraft before they make their attack. The interception follows the normal rules, effectively being anaction within an action
. After the interception has been carried out play returns to the ground attack action. - Stand Down
- The formation may do nothing this turn. An aircraft formation that fails its action test must choose to take a stand down action.
Aircraft Approach Moves
Aircraft carrying out an interception or ground attack action are set up touching their own side’s table edge (choose an edge randomly if your side doesn’t have a table edge in the scenario being played). After the formation is set up it carries out an approach move.
Aircraft making an approach move may travel an unlimited distance over the tabletop when they move. Aircraft are assumed to be travelling high enough above the ground to fly over terrain, zones of control, and other units (in other words they ignore all three things!) By the same token, other units may ignore aircraft and aircraft zones of control when they move. Note that aircraft may not assault other units.
Aircraft must generally travel straight ahead in the direction they are facing, and can only change direction by turning. Aircraft belong to one of three manoeuvre classes that determine how easily they can turn when they move, as described below. The three classes are: Fighters, Bombers, and Fighter-Bombers. An aircraft’s manoeuvre class is noted instead of its speed on its data sheet.
- Fighters
- Fighters may make one turn of up to 90° after moving at least 30cm. Once the fighter has made a turn it must move another 30cm before it can turn again.
- Bombers
- Bombers may make one turn of up to 45° after moving at least 30cm. Once the bomber has made a turn it must move another 30cm before it can turn again.
- Fighter-Bombers
- Fighter-bombers manoeuvre as bombers when making an approach move if they are carrying out a ground attack action (because they are laden down with bombs or rockets), and behave like fighters under any other circumstances.
Aircraft Attacks
After aircraft have made their approach move they are allowed to attack. Aircraft carrying out a ground attack action may attack an enemy ground formation. Aircraft carrying out an interception mission may attack an enemy aircraft formation. Aircraft are assumed to be flying high enough in the air to ignore any terrain that might block the line of sight when they shoot at any targets, and the crossfire rule does not apply to aircraft attacks. This aside, resolve the attack using the normal shooting rules.
After the aircraft formation has made an attack, its action is over. It remains in play until the end phase, at which time it must make a disengagement move and exit the table (see Disengagement Moves).
Anti-aircraft Attacks
Some weapons have an anti-aircraft value (AA) that can be used to attack aircraft, and only aircraft. Aircraft can shoot at other aircraft either when making a flak attack (see Flak Attacks) or when attacking as part of an interception action. Ground units may only shoot at aircraft when making a flak attack, and may not choose to shoot at aircraft formations as part of one of their actions (this rule stops ground units rushing over
to attack aircraft before they can disengage).
Roll to hit using the weapon’s AA value. If a hit is scored then the aircraft must make a saving roll to see if it is destroyed. The crossfire rule does not apply to aircraft. Aircraft that are carrying out a CAP or Intercept action may add +1 to all of their to hit rolls.
Fighters and fighter-bombers can choose to jink
when they have to make a saving throw. Jinking represents the pilot desperately swerving his plane to one side in order to try and dodge the enemy attack. All of the aircraft in a formation must jink, or none at all. Aircraft that jink receive a 4+ saving throw instead of their normal armour save but lose their attack if they have not already taken it (they are concentrating on dodging enemy bullets). Place a suitable marker on the aircraft as a reminder it can’t shoot.
Flak Attacks
AA weapons are designed to fire defensively against an attacking enemy aircraft, and may therefore shoot immediately after an enemy aircraft formation makes an approach move but before it makes its attack. This is called a flak attack. Note that aircraft carrying out a ground attack mission that are armed with AA weapons may shoot at enemy interceptors that fall within the AA weapon’s fire arc. Making a flak attack does not remove overwatch status from a ground formation.
Flak attacks may not be carried out by units belonging to a formation that is marching or broken. This aside, flak attacks are a free
or bonus attack, and making a flak attack does not stop the unit attacking again later in the same turn. What’s more, a flak weapon can make any number of flak attacks per turn against different aircraft formations, as long as it does not attack the same aircraft formation more than once in a turn. Flak units in formations which have taken a move action during the turn fire with a -1 to-hit modifier during the end phase.
No line of fire is required when firing at aircraft, as it is assumed that they are high enough above any terrain features to be seen by all units. Make flak attacks one unit at a time, in any order you like.
Ground units that are armed with AA weapons can shoot at enemy aircraft as they move past them. To represent this, they may shoot at an aircraft formation that moved within their weapon range during their approach or disengagement move, even if the aircraft is no longer within weapon range when the attack is made. Attacks made against disengaging aircraft are resolved when the aircraft reaches the edge of the table, before it is removed to fly back to base
. Units that shot at an aircraft formation as it approached may not shoot at them again as they disengage.
Transporting Ground Units
Aircraft with a transport capacity are known as transport aircraft and are allowed to pick up and drop off ground units. Troops being transported are kept off-board embarked on the transport aircraft until it is deployed. Any units that are picked up and transported off the table may later return to play in the same transport aircraft.
An aircraft must carry out a ground attack action in order to transport units. Transport aircraft are treated in the same manner as war engine transport vehicles, and are only allowed to transport units from another formation as long as the whole formation can fit inside the transport aircraft (see Transport War Engines). If a transport aircraft is destroyed while carrying ground units, then any transported troops are lost with it (no saves in this case!)
Transport aircraft can pick up and drop off their cargo in two ways: by landing or making an air assault.
- Landing
- Aircraft with a transport capability can land after making their approach move and having being fired upon by any enemy flak. If the aircraft lands in dangerous terrain it must take a dangerous terrain test. After the aircraft has landed, any units being transported may disembark and are placed within 5cms of the transport aircraft (skimmers and units with jump packs can be placed within 15cms, to represent them dropping from the aircraft as it comes in to land). Alternatively, the aircraft may pick up any friendly units within 5cms, assuming they will fit on board of course. After embarking or disembarking any units, the aircraft may carry out its ground attack. Note that the limitations that apply to units disembarking from a war engine transport vehicle also apply to units disembarking from an aircraft (i.e., they can’t take an action on the turn they disembark but can shoot with the aircraft—see Transport War Engines).
- Once landed, the aircraft is treated in all ways as a ground unit with a speed of 0 (i.e., it may not move) It may not carry out an action on the turn it lands. If it is involved in an assault and loses then it is automatically destroyed. Once landed, the aircraft may make a disengagement move and exit the table in the end phase of any turn, including the one it landed in.
- Air Assault
- Transport aircraft may choose to land as described above, and then it and any units that disembark are allowed to fight an assault instead of shooting. If this option is chosen then the aircraft and any units that disembark may enter enemy zones of control as if they were charging. The aircraft and any units that disembark are treated as a single formation for the duration of the assault, in the same manner as units disembarking from a war engine taking an engage action (see Transport War Engines). If the aircraft loses the assault it is destroyed, but any units that have disembarked may withdraw normally.
Disengagement Moves
In the end phase, all aircraft that that have not landed must exit the table. Aircraft that have landed may choose to exit the table. Aircraft may exit along any table edge. Simply move the aircraft as you did when it made its approach move, until it reaches a table edge. This is called the disengagement move, and it takes place at the start of the end phase before any ground formations rally.
Blast Markers
Aircraft collect Blast markers in a similar manner to other units, but are affected by them rather differently. The following fairly simple rules reflect the time it takes to rearm and refuel aircraft after a mission. Aircraft in a formation that has come under heavy attack and therefore have a lot of Blast markers will take longer to get ready, and so there is an increased chance that they may not get to carry out a mission.
Aircraft formations collect Blast markers under the following circumstances:
- Any aircraft formation that suffers any attacks (from ground flak or being intercepted) receives one Blast marker for
coming under fire
. The formation can only receive one Blast marker during the approach move and another Blast marker during the disengagement move, no matter how many different units from however many different formations attack it. - The aircraft receives one Blast marker for each aircraft unit that is shot down or point of damage that is suffered if it is a war engine.
- The aircraft receives an extra Blast marker if it exits from any table edge other than its own table edge, to represent the possibility of it being attacked while flying back over enemy territory.
Aircraft are not suppressed or broken by Blast markers, but are not allowed to rally in the end phase either. Instead, the next time that you want to take an action with the formation, take the action test as before, but apply a -1 modifier for each Blast marker on the formation (this modifier replaces the modifier for having one or more Blast markers).
All of the Blast markers are removed from the formation immediately after it takes the action test, whether it passes the test or not. If it passes the test, it may carry out an action, and if it fails it may not.
Aircraft that land are affected by any Blast makers they have picked up normally, and are allowed to rally in the end phase. Any additional Blast markers they pick up will be carried off
with them if they later take off again.
Spacecraft
Most armies have access to spacecraft that can be used to land ballistic entry vehicles and unleash potentially devastating orbital attacks. Each type of spacecraft an army can use has its own datasheet with details of the drop pods and weapons carried by the spacecraft.
The spacecraft of the 41st Millennium are huge. Even a small Imperial Lunar class Cruiser would be over 5 metres long if we made an Epic scale model of it. Because of this neither side is allowed to include more than one spacecraft in their army.
Spacecraft can carry out orbital bombardments, pin-point attacks and land units with the planetfall ability when they take an action. They may carry out all three of these things as part of the same action if they have the ability—their huge crew allows them to carry out a multitude of tasks.
Planning Spacecraft Operations
In order to carry out spacecraft operations you will need a Battlefleet Gothic model representing the orbiting spacecraft.
Spacecraft operations must be planned well in advance, and because of this any spacecraft models must be set up right at the start of the battle before any ground units are deployed. If both players have spacecraft, they should take turns in setting them up, starting with the player with the higher strategy rating.
Spacecraft are set up touching their own side’s table edge (choose an edge randomly if your side doesn’t have a table edge in the scenario being played), facing in any direction. As each spacecraft is set up, the player must declare out loud on which turn the ship will arrive. Note that the turn the spacecraft will arrive is not a secret—they are far too large to sneak up on the enemy! You may choose any turn, from the first turn onwards. However, you may not choose a turn that has already been taken by another spacecraft, and no more than one spacecraft can travel over the battlefield on the same turn.
In addition to saying when the spacecraft will arrive, you must secretly record the drop zone for units entering play using the planetfall ability, (see Planetfall) and also where any orbital bombardments will fall. Each player needs to do this in turn while the other player is not looking.
Simply write down on a piece of paper the coordinates of the drop zone and/or bombardment in relation to the position of the space craft model. The coordinates you plot will determine the centre point of the drop zone and any orbital bombardment your spacecraft fires. For example you might write my drop zone will be 60cm up, 30cm right, and my orbital bombardment will come down 45cm up and 30cm left
. This would mean that the drop zone would be located 60cm up and 30cm to the right of the spacecraft model, while the orbital bombardment would hit a point 45cm and 30cm to the left of the model.
Carrying Out The Operation
Spacecraft operations take place in the action phase of the turn. Simply take an action test for the spacecraft as you would for any other formation. If the test is passed, the spacecraft may make orbital bombardments, pin-point attacks, and carry out a planetfall as described in the sections that follow (see Orbital Bombardments, Pin-Point Attacks and Planetfall).
After any attacks or landings have taken place, the spacecraft model is removed. If the test is failed then the spacecraft has been delayed and fails to arrive this turn; you may roll for it again next turn as long as no other spacecraft are scheduled to arrive that turn. If the next turn has been taken, then the delayed spacecraft will arrive in the first available free turn.
Orbital Bombardments
If a spacecraft can carry out an orbital bombardment this will be noted on its datasheet.
Orbital bombardments cover an area considerably larger than an artillery bombardment, and so require a barrage template that is 12cm across. By a remarkable stroke of good fortune this happens to be the same size as the Ordnance template used in Warhammer 40,000, and if you happen to have any of these we recommend you use them (I know, it’s almost like we planned it, isn’t it) If not then make your own templates from card or acetate.
Take one of the templates and place it with its centre at the coordinates you recorded at the start of the battle. Note that you don’t need to pass a second initiative test in order to carry out the bombardment—the one you passed earlier on allows the bombardment to take place.
Once the position of the orbital bombardment is known, attack any units under the templates just as you would for an artillery barrage (see Barrages). Orbital bombardments never benefit from the crossfire rule.
Pin-Point Attacks
Pin-point attacks may be made on enemy war engines (war engines are the only things big enough for a spacecraft to pick out on the battlefield). Pick a target anywhere on the table and then attack it with any pin-point attacks the spacecraft may have. You may target different war engines with each pin-point attack if you wish, or concentrate all of the attacks on a single target. Note that you do not need to record the co-ordinates of pin-point attacks.
Planetfall
Some armies are allowed to land ground units from orbiting spacecraft in specially modified vehicles. These vehicles are mainly used to carry troops from orbiting spacecraft to the planet below. Most are more like manned missiles than aircraft, and are designed to be fired at extremely high speeds into the planet’s atmosphere. At the last moment, powerful jets slow the descent of the vehicle allowing it and its cargo to land safely on the planet’s surface. The high speeds that the vehicles travel at makes it almost impossible for weapons to engage them before they have landed. This is known as making a planetfall.
Any unit capable of making a planetfall will have this noted on its datasheet. The datasheets for a spacecraft will note the type and number of units it may carry that can make planetfall. It is assumed that a spacecraft can also carry any cargo that will be transported in the unit with the planetfall ability. Units entering play by planetfall and their cargo (if any) should be kept off the table until they have landed.
You can make a planetfall on the turn the spacecraft transporting the units enters play. Carry out the planetfall after carrying out any bombardments and/or pin-point attacks. Take one of the units with the planetfall ability and place it anywhere on the table that is within 15cms of the drop zone co-ordinates recorded at the start of the game (see Planning Spacecraft Operations). The unit then scatters 2D6cms in a random direction (we recommend using a Games Workshop scatter dice to determine the direction, but any mutually agreeable method will do). Any units being transported are allowed to disembark immediately on landing, or stay on board and disembark later. Landing does not count as movement for the purposes of triggering enemy overwatch fire. Disembarking triggers overwatch fire as normal.
Carry on doing this until all of the units with the planetfall ability that are on the spacecraft have landed. Units that end up out of formation due to scattering as they land must move back into a legal formation when they next take an action (see Formations and Actions).
Units entering play by planetfall are destroyed if they land off the table. If the unit lands on terrain that is impassable or dangerous for it, or on top of any sort of unit (friend or foe), or in an enemy zone of control, then it is assumed that on-board automatic guidance systems will divert it towards a safe landing point and the unit is moved by the opposing player to the nearest area of clear ground where it can land.
Units that land by planetfall may take an action later in the turn. In effect the units land from the spacecraft when the spacecraft takes its action, and can take an action of their own later in the same turn. Remember that any formations that have landed by planetfall and scattered out of formation must move back into a legal formation when they take an action. Aircraft that land by planetfall are treated in the same manner as a landed aircraft (see Transporting Ground Units), and they may take off again later in the game.
Aerospace Training Scenarios
Today had been a good day for Krukfang; plenty of firing, plenty of speed.
The rules for aerospace operations, like the war engine rules that preceded them, are fairly long and complex, and for this reason it is best to learn how to use them by playing the following training scenarios before you use them in full-sized games. The training scenarios concentrate on the aircraft rules exclusively, as these are both the most complex and the most commonly used.
Note: The datasheets for these two scenarios are on the next page and in Section 5.0.
Death From The Skies!
In the sulphur-yellow skies above Armageddon, Ork fighta-bommers battle with Imperial Navy Thunderbolts and Marauders in a deadly dance of death. Typical of these engagements was the Ork aerial attack on Imperial Command Bunker Complex 17c, home to the Headquarters of the Imperial Guard 2nd Asgardian Rangers regiment. More than half a dozen Ork fighta-bommers from Harthag’s Deffblasta’s Flyboyz Sqwadron attacked the complex, and were intercepted by elements of the Imperial Navy’s 222nd Interceptor Strike Wing. The air combat that unfolded is considered by many to be one of the classic aerial engagements of the Armageddon wars.
- Ork Forces
- Two formations each consisting of four Ork Fighta-Bommers. The force has a strategy rating of 3 and all formations have an initiative value of 3+.
- Imperial Forces
- One formation consisting of three Imperial Navy Thunderbolt Fighters, plus two formations each consisting of one Command Bunker and one Hydra AA vehicle, and one formation consisting of three Basilisk artillery vehicles and one Hydra. The force has a strategy rating of 2 and all formations have an initiative value of 2+.
- Gaming Area
- Set up a playing area approximately 90‒120cm square. Set up any scenery you have in a mutually agreeable manner. You can set up as much or as little scenery as you like, but try to make sure that you have at least a couple of hills and either a built-up area or some woods for the troops to hide behind or take cover in.
- Deployment:
- The Imperial player sets up first, and must set up all of the ground formations in his force anywhere he likes on the table. Both sides’ aircraft are off the table at the start of the battle.
- Special Rules
- See Power of the Waaagh! for Power of the Waaagh!
- Victory Conditions
- The Ork player has three turns in which to destroy both Command Bunkers and all three Basilisks. If he succeeds he wins, if not the Imperial player wins.
Thunderhawk Down
Acheron Hive fell without warning on the fifth day of the invasion of Armageddon, the victim of treachery by none other than ex-Imperial Governor Herman von Strab. Intelligence reports indicated that von Strab was located in a captured command bunker just outside the hive city. A small force of Terminators from the Salamanders Chapter were despatched in a Thunderhawk Gunship in a bid to capture the traitor. The Terminators landed just outside the bunkers and quickly overran the complex, but found that von Strab had already left. Things started to go wrong when Ork Fighta-Bommers ambushed the Thunderhawk sent to evacuate the Terminators. Only the Thunderhawk’s legendarily sturdy construction and the timely assistance of some Imperial Navy Thunderbolt fighters allowed it to survive and pick up the Terminators. When the Thunderhawk returned to base only one engine was still functioning, all of its crew had either been wounded or killed, and bullet holes caused by over 250 big shoota shell hits were counted on its hull. All of the Terminators sent on the mission were evacuated safely.
- Imperial Forces
- One Thunderhawk Gunship, plus one formation consisting of four Space Marine Terminator units, and one formation consisting of three Imperial Navy Thunderbolt fighters. The force has a strategy rating of 5. All Space Marine formations have an initiative value of 1+, and the Thunderbolts have an initiative value of 2+.
- Ork Forces
- Two formations each consisting of three Ork Fighta-Bommers, and two formations each consisting of one Command Bunker and one (traitor) Imperial Guard Hydra AA vehicle. The force has a strategy rating of 2. Traitor Guard formations have an initiative value of 2+, and the Ork Fighta-Bommerz have an initiative value of 3+.
- Gaming Area
- Same as Death From The Skies!.
- Deployment
- The Ork player sets up first, and must set up all of the ground formations in his force anywhere he likes on the table. All remaining formations are off the table at the start of the battle. The Space Marine player may teleport the Terminators into battle if he wishes to (see Teleport).
- Special Rules
- See Power of the Waaagh! for Power of the Waaagh! and They Shall Know No Fear for They Shall Know No Fear.
- Victory Conditions
- The Imperial player wins if he destroys both bunkers with close combat attacks, and then manages to exit at least one Terminator unit off the table in a Thunderhawk Gunship. The Imperial player gets a draw if he destroys both bunkers. Any other result is a win for the Ork player.
- Damage Capacity 3
No units may enter the bunker as it is filled with comm’s gear.
Forces
This section of the Epic rules includes datasheets for each of the armies, plus a reference sheet that groups all of the game tables together into one place. The following abbreviations are used on the datasheets:
- AC
- Aircraft
- AV
- Armoured Vehicle
- (bc)
- (base contact)
- BP
- Barrage Points
- CC
- Close Combat
- CH
- Character
- D
- Disrupt
- DC
- Damage Capacity
- EA(+x)
- Extra Attacks (+x)
- FF
- Firefight
- FS
- First Strike
- FwA
- Forward Fire Arc
- FxF
- Fixed Forward Fire Arc
- GM
- Guided Missile
- IC
- Ignore Cover
- Ind
- Indirect Fire
- INF
- Infantry
- L
- Lance
- Left
- Left Fire Arc
- LV
- Light Vehicle
- MW
- Macro-weapon
- Right
- Right Fire Arc
- RrA
- Rear Fire Arc
- S
- Sniper
- SC
- Spacecraft
- Slw
- Slow Firing
- SS
- Single Shot
- TK(x)
- Titan Killer (x)
- WE
- War Engine
- WM
- Weapon Mount
Epic Armageddon Reference Sheet
| Blast Markers | Result | Effect |
|---|---|---|
| Each Blast Marker | Unit Suppressed | May not shoot |
| One per unit | Formation Broken | Withdraw |
|
| Formation has at least one Blast marker | -1 |
| Formation is trying to retain the initiative | -1 |
| Target is in cover | -1 |
| Attacker is carrying out a double or marshal action | -1 |
| Attacker is carrying out a sustained fire action | +1 |
| Target | D6 rolls needed |
|---|---|
| 7 | 6 followed by 4, 5 or 6 |
| 8 | 6 followed by 5 or 6 |
| 9 | 6 followed by 6 |
| 10 | May not be hit |
| For each kill you have inflicted | +1 |
| You have more units | +1 |
| You have more than twice as many units | +1 |
| Your formation has no Blast markers | +1 |
| The opposing formation has more Blast markers | +1 |
| For each unit with Inspiring | +1 |
| Formation is broken | -2 |
| There are enemy units within 30cms | -1 |
|
| Barrage Points | Extra Templates | Extra Blast Markers | To Hit Rolls | |
|---|---|---|---|---|
| AP | AT | |||
| 1 | None | None | 6+ | 6+ |
| 2 | None | None | 5+ | 6+ |
| 3 | None | None | 4+ | 5+ |
| 4–5 | One | None | 4+ | 5+ |
| 6–7 | One | One | 4+ | 5+ |
| 8–9 | Two | One | 4+ | 5+ |
| 10–12 | Two | Two | 4+ | 5+ |
| 13–15 | Two | Three | 4+ | 5+ |
| 16–18 | Two | Four | 4+ | 5+ |
| Terrain | Infantry | Vehicle | War Engine |
|---|---|---|---|
| Buildings | 4+ Cover Save | Impassable | Impassable |
| Cliffs | Impassable | Impassable | Impassable |
| Fortifications | 3+ Cover Save, See rules | See rules | Impassable |
| Jungle | 4+ Cover Save | Impassable | Dangerous |
| Marsh | 6+ Cover Save, Dangerous | Dangerous | Dangerous |
| Open Ground, Hill Slopes | No Effect | No Effect | No Effect |
| River | 6+ Cover Save, Dangerous | Impassable | No Effect |
| Roads | See rules | See rules | See rules |
| Ruins, Rubble | 4+ Cover Save | Dangerous | Dangerous |
| Scrub | 6+ Cover Save | No Effect | No Effect |
| Woods | 5+ Cover Save | Dangerous | Dangerous |
Epic Gaming
Myriad are the ways of war. The lightning strike, the tenacious defence, the cunning ruse; all have their time and place, oft as not dictated by the lie of the land or balance of forces that you find at your disposal. The art of war is learning how to bind the tactics, terrain and forces at your command to your advantage.
Tournament games are the single most popular form of Epic game. This is mainly because it is the easiest way to play Epic. All you have to do is use the army lists to collect an army, safe in the knowledge that you can use it to play an even and balanced game even against a complete stranger, something that is simply not possible with scenarios or campaigns. In order to achieve this happy state of affairs, tournament games require three things: army lists, points values, and a set of tournament game rules.
An army list, as its name implies, is a list of units and formations that can be used by an army. What sets it apart from a simple order of battle, such as the forces included in the training scenarios presented earlier in this rulebook, is that it is a list of things you can use in your army rather than a list of things you must use. So, for example, a Space Marine army list would say something along the lines of: You may have the following things in your army: Space Marine Tactical detachments, Space Marine Assault detachments, Space Marine Terminator detachments…
and so on. Army lists usually focus on one army, for example Space Marines, or Imperial Guard, or Orks, though some cover combined or allied forces. In addition, army lists can either be generic
and cover all armies of that type, or specific
and cover a particular army or famous regiment. For example, a generic Space Marine army list would allow you to collect any Chapter, while a Blood Angels army list would only allow Blood Angel units to be used. The advantage of specific lists is that they can include more interesting and characterful units, while a generic list lacks this level of detail but gives the player more freedom in terms of painting and modelling.
Of course, if players were simply allowed to pick any units or formations they liked from an army list then there is no way that tournament games could be fair—the player with the largest collection of models would always have a big advantage! Because of this, each formation and unit in an army list is given a points value The points value shows how effective the unit or formation is when it is used in a tournament game. So, for example, a mighty Baneblade tank would cost many more points than a humble Leman Russ, as the Baneblade will have a much greater impact on the course of the game. Players are then given the freedom to choose troops from their army list to a set points value. For example, players might agree to play a 2,000 point game, in which case each could pick troops worth 2,000 points from their own army list. As long as the army lists have been worked out properly, then any two armies with the same points value will have an equal chance of winning, although the actual composition of each army may be radically different, even if both are chosen from the same list. Returning to our prior example, one player might choose to take a few Baneblades, while his opponent chooses to take a horde of Leman Russ, but as long as the points values for the two units have been worked out properly then each player will have the same chance of winning the game.
The final piece of the jigsaw is the tournament game rules. In order to create a fair and balanced contest, tournament games need to have a method of setting up the terrain, deploying the armies, and determining the winner that is as even as possible for both sides. These are known as the tournament game rules, and they need to be set out in advance along with the army lists, so that a player can choose his army knowing what sort of battle he will be fighting. Because of the desire to create an even contest, tournament game rules tend to be quite simple. Terrain will usually be kept to a minimum and not include too many exotic features, and both armies will usually deploy in a set-up zone
near their own table edge. Victory conditions can be quite complex, but will almost always be the same for both sides (a process called mirroring
). A very common set of tournament game victory conditions is to play for a certain number of turns, and then for each player to count up the points value of destroyed enemy units to see who has won. A variation on this theme is for each player to place a certain number of objective markers
in the opposing half of the table, with the winner being the player that has captured the most objectives at the end of the game. Previous versions of Epic have used a combination of these two methods, with players winning points for destroying the enemy and capturing objectives, to determine the winner. However, whatever rules are actually used, the aim is always to create as even a contest as possible between the two armies picked from the army lists, and this usually leads to fairly straight-forward line up and fight
battles with a minimum of terrain and mirrored victory conditions for both sides.
The overall effect of this is to create a game that is ideal for pick-up
games between two players that have not met each other before. Tournament games allow the player to simply go ahead and collect an army, choosing whichever models they like within the constraints of the army list, and then turn up at a club or gaming event, find an opponent, and play knowing that the game will be as fair and even as possible.
Epic Tournament Game Rules
The Epic tournament game rules are designed to be used in conjunction with the Epic tournament army lists. They will allow two players to fight an evenly balanced battle with little or no preparation. They are ideal for pick-up games at clubs or shows, and provide an evenly balanced contest in tournaments.
In many ways, tournament games represent the most basic
form of game play, and are designed to be as easy and accessible as possible in order to allow Epic players to play games with the minimum of fuss. Because of this, the tournament rules require little or no preparation other than picking forces from the army lists, while the army lists are designed to work with the packaged range of Epic miniatures produced by Games Workshop, making it easy for players to put together an army. Later sections include rather more advanced rules and guidelines that will allow experienced players to design their own unique formations and units for use in scenarios or campaigns of their own devising.
Forces
Both players pick armies to an agreed points total between 2,000 to 5,000 points using the tournament army lists. It is possible to play games using the tournament rules for larger or smaller games than this, but please note that the army lists have been balanced assuming that armies will fall within this range, and this means that larger or smaller games may be slightly unbalanced.
Set-up
Set up the terrain for the game in any mutually agreeable manner. If one player sets up the terrain then his opponent may choose where to deploy. If you set up the terrain as a joint effort or it was set up by a tournament organiser then the player with the higher strategy rating may choose the table edge he sets up on. If both players have the same strategy rating, then dice to see who gets the choice of table edge. You can pick a long edge, or a corner (half way up each long and short edge). The opponent sets up on the opposite edge or corner.
The tournament game rules have been designed to be played on tables that are 90–150cm wide by 150–240cm long (that’s 3–5 feet by 5–8 feet for you non-metric types!) The ideal size is round-about 120cm by 180cm (4 feet by 6 feet). It is possible to play games on tables that are wider or longer than this, but this may favour certain armies and could lead to an unbalanced game.
The Five Minute Warm Up
Tabletop miniatures wargaming is not an exact science. One person’s line of sight is another’s blocked line of fire, some people love pre-measuring, others hate it, and so on. Because of this after you have set up the terrain for a game you should spend five minutes going through things like how the line of fire rules will work, how the terrain features used will work, and so on. Here are some of the things you may want to discuss:
- The
Counts As
Rule (see TheCounts As
Rule). - Lines of Sight and Lines Of Fire.
- Fire Arcs on units.
- Pre-measuring.
- Templates and if units are
in or out
. - Terrain features—what do they count as on the terrain chart, when are units
in
terrain. - How you will show if a formation is broken, in overwatch or has marched this turn.
- Anything else you can think of!
Place Objective Markers
Take it in turns, starting with the player with the higher strategy rating, to place one objective marker on the table. If both players have the same strategy rating then dice to see who places the first objective marker.
The first objective a player sets up must be placed on their own table edge. The remaining two objectives must be set up in their opponent’s half of the table, at least 30cm away from the opponent’s table edge and 30cm away from any other objectives that have already been placed.
Keep placing objectives until six objective markers have been placed on the table in total. You can use anything as an objective marker but we would suggest using terrain pieces to represent them if you can. In our games, we’ve found that battling over an actual bunker or fuel dump is far more appealing than having your forces sell their lives for a cardboard counter!
You capture an objective if you have a unit within 15cms of it in the end phase and your opponent does not. An objective is contested if both sides have a unit within 15cms of it in the end phase. Units from broken formations or from formations that have rallied that end phase can not capture or contest objectives. Aircraft which have landed may not capture an objective on the same turn that it lands. However, a landed aircraft may immediately contest an objective.
Check at the end of each turn to see how many objectives you control. Objectives do not have a memory
and you will lose control of any you have captured if there are no friendly units within 15cms of them at the end of any subsequent turn.
Setup Spacecraft & Garrisons
If either player is using spacecraft then they are set up now before any other units (see Spacecraft). Units entering play via planetfall should be placed to one side at this time too (see Planetfall).
On-table garrison units are set up after spacecraft have been set up. The following types of formations may be set up on the table as garrisons
at the start of the game:
- Formations where half or more of the units (rounding up) are scouts or
- Formations where no more than one of the units has a move greater than 15cms, and where none of the units are war engines or
- Any formations that include units with a speed of 0 (zero).
Players take it in turns to set up one garrison at a time, starting with the player with the higher strategy rating. Garrisons must be set up so that they have at least one unit within 15cm of an objective in the player’s own half of the table. No units may be set up in the opponent’s half of the table or in impassable terrain. Units may be set up in dangerous terrain (it’s assumed that they took their time getting into position in order to do so safely!)
Each player may start up to two of their garrisoned formations on Overwatch. These formations represent sentries deployed as a trip wire and to provide security at the objectives. They are assumed to have gone on Overwatch in their previous Action phase. That Overwatch is carried over
into the first turn.
Set-up Remaining Formations
All of the remaining formations in the players’ armies must be set up within 15cms of their own side’s table edge or be kept back in reserve
. The players take it in turn to set up these formations one at a time, starting with the player with the higher strategy rating.
Units kept in reserve must either be aircraft, or be going to enter play in a transport aircraft or by teleportation. Reserve formations entering play in aircraft or by teleportation should be placed aside with units that will enter play via planetfall. These formations are not secret
and your opponent may inspect them at any time.
Units being transported must start the game already loaded into the transport vehicle that will bring them into play (i.e., an aircraft or unit with the planetfall ability).
Formations entering play in aircraft or from spacecraft can do so on any turn, following the rules for transport aircraft and planetfall (see Transporting Ground Units and Planetfall). Formations that are in reserve may not carry out any game functions or use special abilities they may have.
Victory Conditions
You must check to see if either player has won at the end of the third and fourth game turns. If neither player has won at the end of the fourth turn then the tiebreaker
rule is used to determine the winner.
Each player is trying to achieve five things known as goals. You win if you have achieved two of these goals in the end phase of turns three or four, and you have achieved more goals than your opponent. The five goals are: Blitzkrieg, Break Their Spirit, Defend The Flag, Take And Hold, and They Shall Not Pass.
- Blitzkrieg
- You achieve this goal by capturing the objective that was set up on the opponent’s table edge at the start of the game (i.e., the first objective each player set up).
- Break Their Spirit
- You achieve this goal by destroying (not breaking) the formation worth the most points in the opposing army. If several formations are tied for the most points, you achieve this goal by destroying any one of them.
- Defend To Flag
- You achieve this goal if you control all three objectives in your half of the table.
- Take And Hold
- You achieve this goal by capturing a total of two objectives in your opponent’s half of the table.
- They Shall Not Pass
- You achieve this goal if there are no unbroken enemy formations in your half of the table.
If neither player has won at the end of the fourth or any subsequent turn then both players roll a D6 to see if the game carries on another turn or ends in a tiebreak. If both players roll the same number then the game carries on for another turn and the players must roll again at the end of the next turn to see if the game ends or carries on another turn, and so on.
If the players roll different numbers then the game ends in a tiebreak. Each player scores a number of victory points equal to the full points value of any enemy formations that have been completely destroyed, plus the full points value of any enemy formations that are broken and have been reduced to half strength or less, plus half the value of any formation reduced to half strength or less but is not broken, plus half the value of any formation that is broken but is above half strength. Whoever has the higher points score is the winner. For the purpose of this rule, a formation’s strength
is equal to the number of units in the formation plus the (remaining) damage capacity of any war engines.
Tournament Army Lists
Do not throw your forces blindly into battle. Before committing your forces, examine the situation. Review your own strength, and that of your enemy. Remember your own objectives, and try to anticipate those of your opponent. Then select those of your troops best suited to the task in hand.
The following army lists are designed to work with the range of models produced by Games Workshop for Epic, and will produce a closely balanced game when used along with the tournament game rules (see Epic Tournament Game Rules).
Although each army list is based on one particular fighting force, they are typical of many other similar armies, and so all of these lists can be used as stand in
lists for players that may already have collected an Epic army from a previous edition of the rules.
In order to use the army lists, you and your opponent must agree upon a points total for the game that you will play, and then select formations from the army lists that are equal to or less than this value. For example, you might agree to play a 3,000 point game, in which case you would both pick formations whose points value comes to 3,000 points or less.
The attached army lists provide points value for all of the models available in the Epic range. The counts as
rule opposite will make it easy for you to use non-standard models in your games, and the appendices at the end of this book include sections on how to use models that are no longer in production from older versions of Epic in your games too. Our aim is to make it as easy as possible for players to use all of the models in their collection without receiving an unfair advantage by so doing, and as long as you use the rules in this spirit you will find your games all the better for it.
Each army list is broken down into four parts:
- Forces
- This section tells you which datasheets to use from Section 5.0.
- Using The Army List
- This section tells you how to use the army list, and covers the different types of formation used by the army and how they can be selected from the list.
- Special Rules
- The special rules that apply to the army list.
- The Army List
- The army list describes the formations that can be used in the army, the units that make up each formation, and gives a points value for each formation. It also includes the army’s strategy rating and the initiative rating for any formations in the army. The datasheets for all of the units in the armies can be found in the Forces section (see Forces).
The ‘Counts As’ Rule
You may if you wish decide that certain units in your army count as
something else from the army lists that is of roughly the same size and function. This is especially useful if you are using old models that are no longer in the range and therefore not covered in the army lists, or you are using models that are painted differently. For example, you might have managed to lay your hands on some of the old metal Ork Squigoth models that we made many years ago but that are now no longer in the range. Rather than leaving these models languishing on the shelf you could simply decide that they count as
Ork Battlewagons, which are roughly the same size as a Squigoth and have a similar function. Alternatively, you may have decided to use the Steel Legion army list to represent a different Imperial Guard regiment with a very different colour scheme. Again, it would be a great shame not to be able to use your gorgeously painted army, and the counts as
rule will allow you to do so. However, if you decide to use the counts as
rule, then there are three very important things to bear in mind:
- First of all, before the game starts you must tell your opponent that you have decided to use the
counts as
rule, and you must let him know what counts as what. - Secondly, this rule is here to allow you to use all the models in your collection, not as a method of fine-tuning your army for every game that you play. Therefore you may not use the
counts as
rule for units that are actually covered in the army lists. For example, if you have a model of a Land Speeder, then you must use it as a Land Speeder and pay the points for a Land Speeder; you could not use it as a Land Speeder Tornado, or a Predator, or any other unit for that matter. By the same token, a Land Speeder Tornado must be used as a Land Speeder Tornado and can’t stand in for any other units. This rule is included to prevent confusion and keep game play as even and balanced as possible. Note that you can paint the unit in any way you like, you just can’t count it as a different unit from the list. - Finally, if you decide that any unit in your army
counts as
something else, then all of that type of unit in your army must count as the same thing. For example, if you decided that your old Squigoth model was a Battlewagon, then all the Squigoths in your army would have to be Battlewagons—you couldn’t have one Squigoth as a Battlewagon, one as a Gunwagon, and so on.